Wednesday, June 30, 2010

Beat the Heat with Some Cool Cucumbers

We've had a long string of pretty hot days here in DC this summer so my husband and I were grateful we were invited to a poolside party this weekend.  Another guest was grilling so I wanted to bring a side dish that was cool and wouldn't be too filling in the heat.  A refreshing cucumber salad fit the bill.  Mix in some grape tomatoes and fresh mint and you have yourself a easy summer dish.

Cucumber Salad with Tomatoes and Mint

1/3 cup red wine vinegar
1 Tbsp sugar
1 tsp salt
4 large cucumbers, peeled and chopped into bite-size pieces
1/2 cup red onion, chopped
1 pint grape tomatoes
1/3 cup fresh mint, chopped
2 Tbsp olive oil
salt and pepper, to taste


In a bowl, combine red wine vinegar, sugar, and salt.


Stir in cucumbers.  Add onion, tomatoes, and mint.


Then, gently toss with olive oil and add salt and pepper to taste.

Tuesday, June 29, 2010

Summer Saute

The markets are really booming with fresh produce now.  I love this time of year.  Everything is so fresh and tasty that it doesn't take much effort or many complicated ingredients to make your dinner delicious. I especially like the ease of creating dishes with fresh herbs for a truly seasonal flavor.

Our backyard herb batch has been a great asset, even our basil is doing well.  I mention the basil for several reasons.  First, because it is a mainstay herb of summer and makes a nice complement to the veggies you pick up at the farmer's market.  But, also because apparently a fungus is attacking and killing basil plants across the country.  It isn't toxic to humans, but it can make for a disappointing harvest.  It is impacting growers across the country, so you may see less fresh sweet basil in your markets or your backyard.

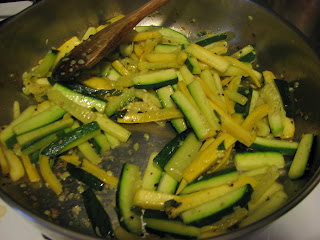
If you are lucky enough to snag some fresh basil, however, chop it up and add it to a saute of summer squash and zucchini.    It is a quick side dish for grilling since it only takes about 5 minutes on the stove top.  Then, you can go right back to enjoying the long summer evenings...

Zucchini and Summer Squash Saute
Makes 3 to 4 servings

1 large zucchini
2 small yellow summer squash
1 1/2 Tbsp fresh basil, chopped
kosher salt and coarsely ground black pepper, to taste
2 1/2 Tbsp olive oil

Slice zucchini and squash into matchstick pieces.


Lightly mix first four ingredients in a bowl.


Heat olive oil in medium saute pan.  Add ingredients from bowl and saute gently stirring until slightly soft and beginning to brown, about 5 minutes.


Serve immediately.

VARIATIONS:  You can easily vary the proportions to make more or less depending on how many folks you want to serve.  This recipe can also take on other flavors...you could add garlic or hot peppers or change the fresh herb to oregano, dill, or mint.  It is also delicious with the addition of fresh tomatoes.

Monday, June 28, 2010

Take Me Out to the Ballgame

Take me out to the ballgame...
Take me out to the fair...
Buy me some peanuts and Cracker Jack...
I don't care if we never get back...

I used to enjoy getting boxes of Cracker Jack when I was a little kid - not because I thought it was all that good, but because I wanted the prize.  As I got older, even the prize lost its appeal for me.

I decided to bring back the enjoyment this weekend by mixing up a batch of homemade Cracker Jack.  It is pretty easy and makes for a tasty treat for your summer outings.

Homemade Cracker Jack

4 to 6 quarts of popped popcorn
1/2 cup butter
1 cup brown sugar
1 cup light corn syrup
1/2 tsp baking soda
1/2 tsp vanilla
1 1/2 to 2 cups nuts, chopped

Pop popcorn and place in a large buttered roasting pan.  The amount of corn you pop depends on how heavily you want your popcorn covered by the caramel mixture.  The more popcorn you pop, the lighter the coverage.   We used an air popper to pop the corn, and I've found that 1/2 cup of unpopped kernels makes about 3 quarts of popped popcorn.


I turned on the oven to 200 degrees F and put the roasting pan full of popcorn in while we made the caramel.


On the stovetop, melt the butter, brown sugar, and corn syrup, stirring constantly while it is heating.


Once it starts to boil, stop stirring and let it boil for 5 minutes.  Take the popcorn out of the oven in preparation for coating it in caramel.


When the 5 minutes has expired, remove the pan from the heat, and stir in the baking soda, vanilla, and chopped nuts.  We used a mixture of peanuts and almonds.  Make sure it is well blended and then pour it over the popcorn.  It is helpful to have a partner here to help you stir the mixture as you scrape the pan.

Once the popcorn and caramel are well mixed, put the roasting pan back in the oven and increase the temperature to 250 degrees F.  Every 15 minutes for an hour and 15 minutes, remove the roasting pan and stir the mixture to ensure even coating.


Break apart and let it cool before serving or storing.  Enjoy!

Friday, June 25, 2010

Mmmm...Pie

My husband and I were invited to dinner by my husband's friend Tony this week.  He grilled up some steaks while we played with his two-year-old daughter.  What a cutie!

I thought it was the perfect occasion to make the cherry pie I'd been contemplating.  Plus, it would use the rest of the tart cherries.  I love to make pie, but it is a bit much to make for just my husband and myself.  It is a better dessert to share.  However, you don't want too many people to share it with because then you don't have any pie to eat the next day or later that night!

It took me a while to feel like I mastered pie crust. I tried several different recipes and techniques and it took me a while to be satisfied.  I think a crust that uses both butter and shortening is key.   I think the flavor of a butter crust is best, but the shortening makes it a little more forgiving and easier to work with.

You also need to practice.  Don't expect your crust to come out perfectly the first time...it takes time to get the feel of rolling it out.  It is worth it, though, and it isn't bad to have to eat pie regularly.  We certainly enjoy it!

Cherry Pie
Makes one 9 1/2 inch deep dish, double-crust pie

For crust:
1 1/2 sticks cold unsalted butter, cut into 1/2-inch dice
1/4 cup Crisco
2 1/2 cups all-purpose flour
1/2 tsp salt
1/2 cup ice water

I cube the butter right out of the refrigerator and place in a bowl with Crisco and flour. I then place this bowl in the freezer for about 15 to 20 minutes. It is important to keep the ingredients and dough cold.  Then, I use my pastry cutter to blend until it is consistency of pea-sized crumbs.

Drizzle on the ice water and stir with a fork until crumbs are moistened and it is starting to clump together.


Press the dough into a ball and divide into two pieces, one slightly smaller than the other (that will be top pie crust). Flatten into disks, wrap in plastic, and refrigerate until firm, at least 30 minutes.

For filling:
7 cups of pitted tart cherries
1 1/2 - 2 cups of sugar
1/4 cup of cornstarch
1 Tbsp lemon juice
1/4 tsp salt

Mix all ingredients in a large bowl and let it sit for a few minutes to dissolve the sugar and cornstarch.  If it is super juicy, you may want to add just a touch more sugar and cornstarch.


When ready to create pie, roll out dough on floured surface to about 1/8 inch thick and around 13 inches diameter. This is the bottom pie crust that goes into the pie pan.  Place this in the bottom of your 9 1/2 inch deep-dish pie pan.

Pour the cherry filling into the crust.  Roll out the second round of pie dough now.  You can roll it into a circle a little smaller in diameter than the last one in order to cover the pie completely.  Or, you can roll it out into a rectangle and cut strips to weave into a lattice shape.  Or, you can roll it out in a rough shape and use cookie cutters to cut shapes and lay on top of the fruit.  Or, a combination there of...

I used a star cookie cutter to make shapes to lay on top of the cherries this time.  It felt more festive to me.


Bake in a preheated 375 degree F oven for 1 1/2 to 2 1/4 hours until the filling is bubbling and the crust is golden brown.  You need to be careful of leakage.  These cherries were very juicy and the pie started oozing juice over the edges of the pan.  I placed the pie pan on top of a cookie sheet to catch the leaking juice and to save me cleaning the oven.  It can still cause some smoke as the sugar burns, so don't say I didn't warn you.


Thursday, June 24, 2010

The Braise on the Street

Those of who know my husband and I know that we don't live in the best neighborhood here in Washington, DC...We are always on the look-out for illegal behavior and we make it clear to our neighbors that we are watching out for things.  We attract a lot of attention for this attitude and because we have two big dogs.  And, probably because we are the only white folks for several blocks.

Night before last, though, really got the neighbors talking.  My husband was walking our dog Charley when he was charged by the neighbors little poodle.   He brought Charley back inside and led the little dog back home.  Trying again to walk Charley, the poodle escaped once more to charge them.  Hearing the barking again, I walked outside to escort the poodle back home and talk to his owner.  Then, we noticed that her car's trunk was open and her front door was ajar.  Concerned, I took Charley's leash and my husband walked up to the neighbor's door.  He knocked and called her name while fending off bites from her two small dogs who were barking ferociously.  At this point, neighbors on all sides have stepped into their yards to watch the commotion and see what those crazy white folk were up to again.  The poodle's owner finally answers the door, and when she and her boyfriend stepped onto the porch to speak to my husband it was clear they were on something and in fact had been simmering in something for quite some time.

I found this ironic since for dinner I had served beef that had been braising in beer for hours.  What is braising you ask?  Braising is a cooking technique in which meat is seared or browned in a bit of fat and then simmered in liquid at a low temperature in a covered pot.  It works great with tough cuts of meat by breaking down the tough connective tissue in meat.  It has an effect similar to barbeque, or apparently the drug our neighbors were on, which seemed to break down the fibers in their brains and impact their ability to think or speak clearly.  Braising is a very simple technique that results in tender meat with a delicious sauce or gravy.  The only perceived drawback is you may have to plan for several hours of cooking, but it is non-active cooking - you just leave it in the oven or on the stovetop and let it go.

For those of you interested in the resolution of my story...it seems as though the neighbors were just high and being careless with their car and dogs.  They mumbled a few words of thanks, walked out to their car to lock it up, and brought the dogs inside.  The others on the street stared at us for a bit longer, and then shuffled back to their porches or went back to their game of street ball.  Nothing more to see here, people.  Just another beautiful day in the neighborhood...

Beef and Onions Braised in Beer

3 medium white onions
1 (4 lb) boneless beef chuck roast
2 1/2 Tbsp canola oil
2 bay leaves
3 (12-oz) bottles or cans of lager-style beer, such as Miller High Life (keeping it classy, folks)
2 cloves of garlic, minced
salt and pepper to taste

Slice onions lengthwise into long strips.  You can slice it in half lengthways and then slice thinner slices lengthwise again.


Pat beef dry with a paper towel to allow the seasonings to stick better and then sprinkle with salt and pepper.  For this recipe, I prefer kosher salt and coarse ground black pepper.  Heat 1 1/2 Tbsp canola oil in a wide (5 to 6-qt) heavy pot over medium-high heat until it is shimmery.


Brown the beef on all sides then remove and transfer to a plate.  It took me about 12 minutes.

Add the sliced onions to the pot with the remaining 1 Tbsp of canola oil and cook, scraping up any brown bits from bottom and stirring until onions are well browned.  While the onions are cooking, turn your oven to 350 degrees F.


When onions are done, add the beer and garlic and bring to a boil, stirring and scraping up any brown bits.  This is known as deglazing the pan.  You can vary the type of beer used and the amount of garlic, of course.


Add beef to pot and return to boil.


Then, turn off the burner and cover the pot.  I didn't have a lid to match my hand-me-down pot, so I just covered it loosely with foil.  That worked just fine.

Place it in oven to braise until meat is very tender when pierced in several places with fork.  My roast was in the oven for about 4 hours.


If you want to serve it in slices, transfer the beef to a cutting board and let it stand or rest for about 20 minutes.  Place the slices on a plate and drizzle with the sauce.  I decided to shred it with two forks in the  sauce in the pot and served the saucy meat over rice.  Also, this roast was very lean, so there wasn't much fat in the sauce.  If you have a fattier cut of beef, you may need to remove the meat first and skim the fat from the sauce before serving.


NOTE: You aren't going to screw up the meat if you skip the step of patting it dry first.  I do it because I find the seasoning stick to it better.  But, also when I put it in a hot oiled pan, it doesn't splatter with the combination of water and oil.  Some folks believe it creates a better sear or browning on the meat when it is dry, but I haven't conducted any experiments on this myself.

I'd like to hear the opinions of my readers on this...

Wednesday, June 23, 2010

Tart and Tasty Breakfast Treat

So...I have lots of tart cherries left from my picking excursion this weekend.  Don't worry...I'm gonna make a pie, but that still leaves us with plenty.  I spent more than an hour yesterday pitting several pounds of cherries.

Since we killed the scones I made for our cherry jam so quickly, I decided to make another cherry breakfast treat.  My fallback plan for breakfast is always muffins.  I found a very easy recipe from a Michigan bakery that I modified for my purposes.  And, if I may say...they are delicious.

Tart Cherry Muffins
Makes 16 muffins

2 cups all-purpose flour
1/2 cup sugar
1 Tbsp baking powder
1/4 tsp salt
2/3 Tbsp cinnamon
1 egg, beaten
1/4 cup oil
1 1/4 cup milk
1 1/3 cup cherries, stemmed, pitted, and chopped

Crumb Topping:
1/4 cup butter, softened
1/2 Tbsp cinnamon
1/3 cup brown sugar
1/2 cup flour

Preheat oven to 350 degrees F.  Line muffin tins with paper cups.

I mixed dry ingredients together first.


Then, I added the wet ingredients and mixed well.


I added the cherries last.


I poured them into the lined muffins tins and topped them with the crumb topping.


To make the crumb topping, cut the butter into the other ingredients until the mixture resembles small pebbles.


Bake for about 20 minutes, or until your tester comes out clean.


According to Harold McGee, Tips for Perfect Muffins:
  • Mix muffin batter quickly to minimize toughening gluten and losing leavening gas.  One standard method is to beat the liquid ingredients with sugar to dissolve it, then to combine this with flour and leavening.
  • To obtain a shapely peak on the muffin tops, make sure the batter isn't overleavened, fill the cups almost full, and use a relatively high baking temperature, 400 to 425 degrees F.
  • Start checking doneness early.  The cups in muffin pans have varying capacities, so cooking times will vary.  Remove from the oven when a toothpick or other probe comes out clean from the center.
  • Allow muffins to cool and firm for a few minutes before removing them from the pan.

Tuesday, June 22, 2010

Cherries Get Me Out of a Jam


I went cherry picking this weekend.  I love picking fruit, but I learned that I really should not do this alone.  When I am by myself I am not capable of ignoring any rude, insensitive behavior from strangers.  I need the calming influence of other people who can distract me, or at least remind me not to embarrass myself.  I narrowly avoided an incident among the cherry trees this weekend.  I will spare you the dirty details, but a group of rude strangers almost made me lose an entire bucket of tart cherries.  If you've ever picked cherries, you know they aren't the easiest fruit in the world to pull off a tree and fill up a bucket.


I decided to vacate the fields and head home knowing my husband and our kitchen could make me feel better.  Not so fast, missy...your gas tank is on empty.  So, I pull into a nice gas station (calm down, it wasn't BP), and attempt to release the fuel door.  Haha!  Foiled again....it is broken and won't release.   Fortunately, it was a service station and two mechanics walked out to help me.  They finally got the gas tank open, but now the trunk won't close.  After about half an hour, we finally finagle it closed and I'm on my way.  Then, traffic....sigh.

I was pretty cranky when I finally got home.  I admit that one of my many faults is that I have trouble shaking things off, just ask my husband, but I felt particularly pushed that day.  I had lost most of my enthusiasm for cooking with my freshly picked fruit.  Luckily, my husband had not, and he cajoled me into the kitchen to start making cherry jam.  Oh my gosh, I am sooooo grateful I did.

We did an awesome job with this jam.  It is some of the best jam I have ever eaten.  We lick the knife after spreading it on scones.  Tasting this, all my negative feelings disappeared and I was really happy that I had picked tart cherries.  And, I'm pretty confident the rude strangers aren't eating something as good as this with their cherries.


Tart Cherry Jam
Makes about three 8-oz (half pint) jars

3 cups fresh tart cherries
2 1/4 cups sugar
1 Tbsp lemon juice

Wash the cherries thoroughly.


Remove the stems and pits.  We used our OXO Good Grips cherry pitter, which works very nicely.


You can also improvise a cherry pitter and use a wooden skewer, drinking straw, or pastry tip.

I roughly chopped the cherries so that it would not just be whole cherries suspended in jelly.  I was careful to save the juice as I chopped and added it all to the pot.


These cherries were very juicy so there was plenty of liquid with the fruit when I turned on the heat to medium high.  I added the lemon juice and sugar and kept stirring as the sugar dissolved.

Bring to boil and turn down the heat to medium or medium low, continue to stir to prevent sticking.  The  jam will thicken and bubble, keep stirring.


Now to test for doneness.  For the last batch of jam, we used the freezer test.  We dribbled a bit of the cooking jam on a plate and put it in the freezer for a minute, then swiped the puddle with our finger to see if the liquid stayed separate.  This method led to some minor disagreement between my husband and myself, so we decided to use a candy thermometer this time.

It took about 15 minutes of cooking and stirring until the mixture registered 220 degrees F on a candy thermometer.


Pour the jam into hot, sterilized jars and seal.  Process in the boiling water bath for 10 minutes.

As the jars cool down, you should hear a pinging noise as the lids pop from a vacuum forming.  After a couple of hours, press down on the center of each lid.  There should be no flex.  If the lid flexes, you will need to repeat the boiling water bath process to reach a vacuum seal.

Monday, June 21, 2010

Beer, Bourbon, and BBQ...What More Does a Girl Need?

This weekend my husband and I attended the Beer, Bourbon, and BBQ Festival at the National Harbor in Maryland.  For the price of admission, we got a free tasting glass that allowed us to sample as much beer and bourbon as we wanted, a barbeque pork dinner, and generous tastings of roasted whole pigs.


I have to admit we were completely overwhelmed upon entry into the festival.  It seemed as though every where we turned there was food and drink we wanted to consume.  A quick lap around the perimeter helped us develop a plan and we soon settled into to enjoy ourselves for the next several hours.

It was great fun to sample beers and bourbons that we had not yet seen in any of our favorite alcohol establishments.  We made it a goal to focus our initial efforts on beverages we had never tasted before while the taste buds could still focus.  Our only complaint is that there were not more brewers or distillers on hand to answer questions or pitch their products.  We did have enjoyable conversations with Rick Wasmund from Copper Fox Distillery and Mike Kennedy from Evolution Craft Brewing.  In my mind, however, the festival staff and festival exhibitors missed a great opportunity to interact with serious booze hounds in a fun, relaxed environment.

Now for for a few tasting highlights...

Brew Dog Punk IPA - This IPA was paler in color and sweeter in taste than I expected.  It was a great thirst quencher at the hot and steamy festival.  The flavor was lemony, grassy, with maybe a hint of pineapple.  The hops are there, but not in your face.

McSorley's Pale Ale - This had a much lighter flavor than the copper color would make you believe.  Easy to drink, it has a very subtle fruity flavor and scent.  I think the dark ale is the way to go, however for more flavor.

Evolution's IPA - I thought it was the best this Delaware brewery had to offer at the festival.  Agressively hoppy and citrusy, it had a nice floral scent and a good looking amber color.  It was a great beer to pair with the spicy pork barbeque.

Russell's Reserve 10 year - This was an excellent bourbon.  Its complex toffee-like flavor was warmed by vanilla undertones and just a bit of bite and maybe a little orange.  It was a pretty amber color and was smooth on the tongue.  Both my husband and I enjoyed this a lot.

Copper Fox Rye Whiskey - A new offering from Wasmund's Copper Fox, it starts with the same fruitwood scent and flavor as his single malt, and in fact includes some of his malted barley.  Strong and earthy, we enjoyed it best with a splash of water.

Booker's - This was a lovely sipping bourbon.  Smoky vanilla and oak flavors that finished clean on the tongue.  It was a wonderful balance between strong and smooth, and had no bitterness.  An expensive bottle, I will save future glasses for special occasions.

Baker's - Another intensely flavored, but smooth bourbon.  Maybe a bit more carmel and nutty flavors than the Booker's...I think it would be great as an after-dinner drink.

We tried many, many more than this, but I no longer trusted my taste buds or my taste memory at a certain point, so for honesty's sake they are not included in this entry.  We were joined by our friends Wendy and Dave who enjoyed the festival as designated drivers.  We had fun with them and appreciated their willingness to keep us safe.

Friday, June 18, 2010

Beer Review: Magic Hat's Summer Scene Variety Pack

Last weekend, we helped our friends Dave and Wendy host some out-of-town guests in celebrating the impending birth of their first child.  They share my entertaining philosophy that you never want to run out of refreshments.  With that approach,  however, you sometimes end up with leftover food and drink. The attendees didn't drink as much beer as we expected, and because the soon-to-be parents aren't drinking they asked my husband and I to take it off their hands.  I mean, really, what we do for friends, right?


Well, with a big sigh, I loaded up our cooler with the remains of a Magic Hat Brewery Summer Scene Variety Pack.  Actually, we were thrilled because we both enjoy beer from Magic Hat.  It wasn't an imposition...it was a special treat.  I suggested to my husband that we could review the beers for the blog and he willingly agreed.


First up...#9, as described by the brewery it is indeed a not quite pale ale.  You know that song "Revolution 9" on the Beatles' The White Album (Remastered)?  That song played in my head as I swallowed my first sip.  My tongue was a bit confused and didn't quite know where to land.  I felt a similar confusion the first time I heard that Beatles' song.   Magic Hat's #9 was not at all what I expected.  Its apricot flavor was a pleasant surprise.  The texture is thinner and more drinkable than you expect with this flavor, but it is best when very cold.  This beer was an interesting mix of mix of hops and sweetness.  It lacks the bitterness of an IPA, and is not as sweet and heavy as a lambic.

Next was their latest IPA, Blind Faith.  It was a lovely golden-orange color with a creamy head that dissipated slowly.  The beer had a strong hoppy flavor that would hold up well against strongly flavored foods.  I imagine it would quickly overwhelm more delicate dishes, though.  It was very drinkable, but not terribly thirst-quenching.  I really like IPA, but I don't think I would drink very many of these in a row.

Our third selection was Wacko, the summer seasonal.  Both my husband and I  were surprised by the pinkish hue of the beer as we poured it into the glass.  A quick glance at the label and we realized why...beet juice!  Dwight Shrute would be proud.  It was light and refreshing with a subtle citrus flavor...a real lawnmower beer as they say.  However, my husband said he didn't think many men would want to be seen drinking a pink beer at their local bar.

The final offering in the summer variety pack was a ginger-flavored ale called Odd Notion.  The brewery is offering a seasonal rotation of different beers under that name, so this only applies to summer 2010.  We both enjoyed it.  I think it is another strong choice for summer...thirst-quenching and refreshing.  The ginger is not too sharp or overpowering, more of an enhancement to the yeast and hops.

Thursday, June 17, 2010

Granita for Grown-ups

I often get a little carried away at the farmer's market and it can be a struggle not to purchase more produce than we can use in a timely fashion.  Case in point - I picked up some locally-grown blueberries recently without a clear idea of what I would make with them.  They just looked yummy.  I started planning to make some more popsicles, but decided that I would rather have something with a bit more adult sophistication, instead.  Enter the blueberry basil granita.

With a recipe from Epicurious as my guide, I picked basil from our backyard to provide an herbal element that pairs well with fruit.  And with a nod to my dark side, I added a splash (or three) of citrus vodka.

Blueberry Basil Granita
Makes 4 servings

1 pint fresh blueberries
1/2 cup water
8 fresh basil leaves
Juice of 1 lime
1 tsp lime zest
4 tsp honey
2 1/2 Tbsp citrus vodka (optional)


Wash the blueberries and pick out any stems.


Blitz all the ingredients in a food processor or blender until smooth.


Pour into an airtight container and freeze until slushy.  My batch took about 3 hours to reach the right consistency.


Scoop out into individual servings.


If you are feeling sophisticated, too, you can garnish each serving with a sprig of basil or a couple more blueberries.  If you are not feeling sophisticated, stick out your tongue stained blue with berry juice.