The experience really helped us understand the impact wood has on flavoring the spirit. The smell, taste, and appearance of the whiskey changed dramatically as it aged in the barrel. Additionally, because our barrel is so small, the aging process is accelerated. In only months, we had something worth tasting and drinking, as opposed to the years it takes with a full-sized barrel. Yay, homemade whiskey!
Now, you can't jump right in to aging the whiskey when you get your barrel home. First, you need to ensure your barrel won't leak. The easiest way to do this, is to fill the barrel with hot water and let it sit until the seepage stops. The hot water helps the wooden barrel slats expand and fit together more snugly. We also found it helpful to use a spray bottle to moisten the areas where it was leaking. It took us a couple of days to get a tight barrel, but it is worth it. I mean, you don't want to lose a bunch of precious whiskey, right?
Once you have a secure vessel, pour the spirits into the bung hole on the top of the barrel.
(Everytime the phrase "bung hole" was recited, my husband immediately followed it with a laugh from Beavis and Butthead. Yeah, I'm proud.)
Push the bung back into its hole and then practice patience as you wait for your whiskey to be ready.
Additional ingredients can be added to your whiskey before you seal the barrel, if you'd like. For example, Wasmund adds cheesecloth bags full of fruitwood chips to enhance the flavor of their whiskey. We elected to play it straight this round and didn't add anything else to the barrel. We tinkered with the spirits a little later in the process, though.
You can see from the pictures that the barrel has a spigot. This made it easy to sample every few weeks to check our progress and gauge how the barrel changed the whiskey. After regular samples and acquiring additional raw spirits to refill the barrel, we decided to bottle our aged whiskey at the seven month mark. (NOTE: You don't want to leave your barrel empty because you will have to deal with big leaks again.)
It was at this point that we decided to try the chipping technique that Wasmund practices. We created a little cheesecloth bag of toasted applewood chunks to suspend like a tea bag in a portion of the aged whiskey once we removed it from the barrel.
The whiskey we wanted to "chip", we poured into a sealable glass container. We gave this batch an extra month before bottling, and it seems to have made a big difference. In fact, I think the addition of wood chips seemed to "age" the whiskey to the tune of several more months, instead of just one. It smoothed the rough edges of the alcohol and created a depth of flavor to make a unique beverage.
The rest of the whiskey we poured back into the bottles that once contained the raw spirits. Wasmund thoughtfully gave them labels that give room for bottling dates and tasting notes. A great detail, in my opinion.
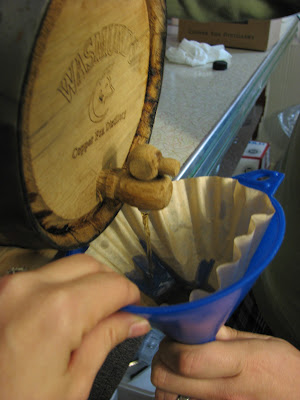
It is important to provide some level of filtering of your whiskey as it comes out of the barrel to keep out wood dust and any other residue that could reside in your little barrel. As you can see, we just used a coffee filter in our funnel, but some folks use more advanced methods and purchase filters for that purpose.
The spirits are quite strong and high in alcohol in the barrel. Wasmund provides raw spirits at around 120 proof. For that reason, you may find it desirable to add some distilled water to your bottles once your aged whiskey is ready. In fact, Wasmund actually designs its bottles with a subtle mark on the side to create a fill level for the whiskey at barrel strength, allowing room for water to be added and thereby reducing the alcohol level.
Here is a side-by-side comparison of Wasmund's whiskey (on right) and our home-aged whiskey (on left). Pretty close, I think...
We definitely like this whiskey, but we've really enjoyed the applewood-chipped batch. And, it looks lovely in a crystal decanter (wedding gift!) on the sideboard (thanks, VA!) in our dining room. Cheers!


Love. this. so. much. What verve! I grew up knowing all about moonshine, but the idea to turn it into whiskey right at home. You just got total cool points in my book honey!
ReplyDeleteWhy, thank you, Baking Without A Box! You are generous, as always, but it is Rick Wasmund who deserves the cool points for sharing his raw single malt and rye spirits with us.
ReplyDeleteUnfortunately the white dog whiskey was terrible. I am a Scotch drinker and enjoy other whiskies as well. The alcoholic sting of this white dog was too strong to enjoy/notice any other flavor. I understand start-up distilleries need to put out something while their real whiskies age, but that doesn't mean they should put out something this bad.
ReplyDelete