Thursday, July 29, 2010

Flat Out Good

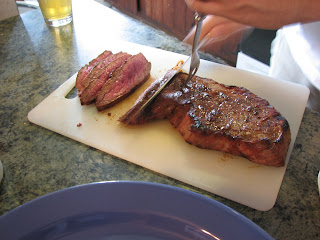
A relative newcomer at the butcher's, the flat iron cut has become one of the best-selling steaks in both grocery markets and restaurants.  It has been described as having the tenderness of a tenderloin and the taste of a sirloin.  The flat iron steak comes from the blade roast of the beef shoulder or chuck.  There is a thick piece of connective tissue that runs directly through the center of it and therefore it had never been marketed as a steak.  But once that connective tissue was removed, meat science students realized there was a very tender steak with a great beefy taste as though it were near ribs.

What makes it even more popular is the price.  Because it is removed from the chuck, just about the cheapest area of beef, flat iron steaks are very affordable.  The trimmed top blade or flat iron (supposedly named because it looks like an old-fashioned metal flat iron) is uniform in thickness and rectangular in shape.

It can be cooked as you'd cook any other premium steak.  As any non-loin steak, the flat iron benefits from marinating because it absorbs flavors beautifully, and is best if you don't cook it beyond medium.  Its strong, deep, rich beef flavor makes it perfect not only on its own, but also as an ingredient for many dishes.  Because it is similar to flat steaks, you could use it in recipes calling for skirt or flank steak.

I elected to marinate and grill our steak.  Here's what I did...

Grilled Flat Iron Steak with Chili, Garlic, and Lime
Serves 2

1 to 1 1/2 lb flat iron steak
juice of 2 limes
4 tsp olive oil
4 cloves of garlic, minced
2 tsp chili powder
2 tsp ground cumin
1 tsp red pepper flakes
1 1/2 tsp kosher salt
1 tsp coarse ground pepper

Combine all ingredients in a zip-top plastic bag.


Once it is sealed, use your hands to thoroughly distribute the marinade over the meat.  Marinate in the refrigerator for at least an hour and no more than 4 hours.

Heat your grill to medium high.  Place your steak on the grill.  Use these cooking times to cook your steak to medium: 2 to 3 minutes per side for a 1/2-inch thick steak, 4 to 6 minutes per side for a 1-inch thick steak, and 6 to 9 minutes for a 1 1/2 to 2-inch thick steak.


Once you take the steak off the grill, let the meat rest for 2 or 3 minutes to allow the juices to reabsorb into the steak before serving.  I was so eager to eat it after letting it rest that I forgot to take a picture!

Wednesday, July 28, 2010

Gin It Up

Did you know that the folks who brew Anchor Steam Beer are now making gin and whiskey?  In the early 90s, the company opened Anchor Distillery, a microdistillery in the same location as the brewery, and began making a single malt rye whiskey, named Old Portero.  A few years later, the microdistillery began producing gin, called Junípero, which is Spanish for juniper.  More recently, they have also begun producing a Genever style gin called Genevieve, using wheat, barley, rye, and the same herbal ingredients as Junípero.


Junípero Gin


I've read about them in some food and spirit publications, but hadn't yet seen them in local bars here in DC.  Well, I finally got a taste this week.  Junípero Dry Gin (98.5% proof, 49.3% alc. by volume) is one of the nicer small-batch, handcrafted gins I've tasted.  It is soft, flowery, and very smooth.  It has a very juniper heavy flavor, but maintains a clean finish.  I thought it worked well with tonic, but given its high proof and botanical flavor, I think it would also make a great martini gin.


Gin is becoming more popular as a drink and because I enjoy it, I've been trying to learn more about the beverage lately.  I've heard gin described as a flavored vodka.  Gin distillers take neutral spirits and a mash of fermented grain then redistill with botanicals to flavor.  The primary botanical source is juniper berries.  In fact, the word gin comes from genever, which is French for juniper.


Historically, gins that were sweetened with sugar for a more palatable taste were called Old Tom.  Terms like Dry or London Dry were used to distinguish unsweetened gins from Old Tom.   Old Tom wasn't automatically a bad gin with sugar added.  The sugar was often added to balance out the bitter botanicals that were used.  This style of gin is making a comeback, but London Dry Gin is still the most popular, and the one I prefer.  


To be labeled London Dry, the gin doesn't need to have been made in London, but production is regulated in many parts of the world to ensure that only a small amount of sweetening and no flavorings or colorings are added.  The natural flavor must come from herbs, fruits, and spices added through the distillation process.  


The third style of gin I've learned about is Genever, which is one of the earliest styles.  Genever styles have a varied range from a light, almost vodka-like flavor to sweetened, fruity, almost liqueur-like bottles.  Pot distilling from a grain mash creates a strong flavor, and genever is not used for martinis or gin and tonics.  It is best served straight - either chilled, over ice, or shaken with ice.  I'll have to try to find Anchor's Genevieve and report back...


Genevieve™ Genever-Style Gin


Monday, July 26, 2010

Angry Clams

We like things spicy around here.  By that I mostly mean, we like to eat spicy foods.  In fact, we add peppers and other spicy elements to just about everything we eat.

I was craving pasta and figured I would make us a quick arrabiata sauce.  Arrabiata means angry in Italian, and describes a simple tomato sauce liberally doused with red pepper.  I changed tack after seeing some cans of clams in my pantry.  Perfect - linguine and clam sauce with some crushed red pepper to make it angry.

Linguine with Spicy Clam Sauce
Makes 4 servings

12 oz linguine pasta
3 Tbsp butter
5 Tbsp olive oil
6 large garlic cloves, minced
3 10-oz cans chopped clams, drained, all juices reserved
1/3 cup dry white wine
1 medium carrot, finely chopped
1 tsp dried oregano
2 Tbsp red pepper flakes
1/3 cup minced fresh parsley

Cook pasta according directions on package.

Meanwhile, melt butter with oil in heavy large skillet over low heat.  Add garlic until fragrant, probably about a minute.


Add reserved juices from clams, wine, carrot, oregano, and red pepper.  Increase heat to high and boil until reduced to about 1 1/2 cups, between 10 and 15 minutes.  Stir in the clams and the parsley.  Turn down the heat and simmer for about another minute.


Drain linguine well; add to skillet of hot clam sauce and gently toss to blend.  Serve immediately.

Friday, July 23, 2010

Book Review: 52 Loaves by William Alexander

In his new book, 52 Loaves: One Man's Relentless Pursuit of Truth, Meaning, and a Perfect Crust, William Alexander describes the year he spent baking a loaf of bread each week in an attempt to replicate a loaf of peasant bread he once tasted. In living out this obsession, he grows and grinds his own wheat, wins second place in a New York State Fair bread contest, and travels to a 1,300-year-old monastery in Normandy to help them restore their practice of bread baking.

This is not a cookbook, and I don’t recommend this book to new bakers.  But, it is well written and I found it to be sympathetic to the travails of home bread bakers searching for the perfect loaf.  Alexander has an interesting sense of humor and I appreciated reading his reflections on the process and particularly about his time with the monks of l’Abbaye Saint-Wandrille.

My mouth watered and I felt a strong desire to return to the kitchen as I read about his ritual of weekly baking, the meditative state achieved in kneading, and the nearly universal positive response to the aroma of fresh baked bread.  I also enjoyed reading his tangents into understanding enriched flour, the disease pellagra, milling wheat, and the images of bread in Da Vinci’s Last Supper painting.

I found, however, that Alexander seemed to make things more complicated than they needed to be and he was often surprised by what are usually seen as simple techniques, like the use of steam and high temperature in baking.  But, I suppose that will happen with a six thousand year old staple of human civilization that consists of a minimum of 4 ingredients, yet has thousands of techniques and variations.  He also seemed to take a while to realize that the definition of the perfect loaf varies around the world and from person to person.

Some of his quest was a bit trite.  I feel as though I’ve already read several other accounts of urban (within NY Times local delivery radius) New Yorkers and their humorous, but likely obsessive adventures in gastronomy.  The difference here was my shared passion for good bread, so I was more tolerant, I guess. I also didn’t care to have so many reports on his marital sex life.  I remember thinking that his high school and college age children must be pretty embarrassed.  I hope his wife was okay with it.

If you enjoy baking bread or reading about obsessive behavior, then I think you will find this an entertaining book.

Wednesday, July 21, 2010

Peachy Keen for Pie

I've been feeling a bit homesick lately.  I find that I usually turn to cooking dishes from home to help me through those feelings.  The brisket we smoked this weekend definitely helped, but so did the peach blueberry pie.

July is usually the sweetest month for peaches in the Hill Country of Texas.  If I were back in Texas now, I would have already gone peach picking and made a ridiculous number of peach dishes.  And, I would have made myself sticky with all the sweet peachy juice.  Mmmm.

According to Texas media sources, the area's favorable fall and winter conditions, paired with no late killing frosts or harsh thunderstorms, have resulted in the best peach crop in years in the Texas Hill Country.  The peaches harvested in the Hill Country are known for truly exceptional taste and quality. The perfect combination of sandy soil, optimal moisture, warm days, and cool nights create a special flavor that folks travel from far and wide to experience.  There is nothing like a fresh-picked Hill Country peach!  I hope you can try one someday, but in the meantime, enjoy the fresh-picked peaches in your area.

Peach Blueberry Pie
Makes one 9 1/2 inch deep dish, double-crust pie


For crust:
1 1/2 sticks cold unsalted butter, cut into 1/2-inch dice
1/4 cup Crisco
2 1/2 cups all-purpose flour
1/2 tsp salt
1/2 cup ice water

I cube the butter right out of the refrigerator and place in a bowl with Crisco and flour. I then place this bowl in the freezer for about 15 to 20 minutes. It is important to keep the ingredients and dough cold.  Then, I use my pastry cutter to blend until it is consistency of pea-sized crumbs.

Drizzle on the ice water and stir with a fork until crumbs are moistened and it is starting to clump together.


Press the dough into a ball and divide into two pieces, one slightly smaller than the other (that will be top pie crust). Flatten into disks, wrap in plastic, and refrigerate until firm, at least 30 minutes.


For filling:
4 cups of fresh peaches, peeled and sliced
2 cups blueberries
1/2 cup sugar
1 Tbsp lemon juice
1/2 cup cornstarch


Mix peaches and blueberries with sugar, lemon juice, and cornstarch.  Taste.  You may want to add more sugar, if it is too tart for you.  I usually err on the side of less sugar so as to allow the fresh fruit taste to come through.  Plus, I usually serve pie with ice cream that adds some sweet. You may also want to add more cornstarch if your peaches are particularly juicy.  Let it sit while you make the crust and you can judge before putting it in the crust.


When ready to create your pie, roll out the larger circle of dough on a floured surface until it is about 1/8 inch in thickness and around 13 inches in diameter.  This is the bottom pie crust for your 9 1/2 inch deep dish pie pan.

Pour the fruit filling into the crust.  Roll out the second round of pie dough now.  You can roll it into a circle a little smaller in diameter that the last one to cover the pie completely.  Or, you can roll it out into a rectangle and cut strips to weave into a lattice.  Or, you can roll it out into a rough shape and use cookie cutters to cut shapes and lay on top of the fruit.  Be creative.  This time I rolled the dough into a circle about 11 inches in diameter and used two sized star-shaped cookie cutters to cut designs into it.  Then, lay it on top of the filling and seal edges.

Bake in a preheated 375 degrees F oven for 1 1/2 hours to 2 1/4 hours until the filling is bubbling and the crust is golden brown.

Tuesday, July 20, 2010

Garlicky Goodness

My mother came for a visit this weekend and while she was in town my brother requested she make one of his favorite dishes - Garlicky Chicken.  Think breaded chicken pieces, pasta, and a butter sauce loaded with garlic...This is not a diet dish.

This is a dish that Mom created for us when we were kids and it was a hit from the start.  It was no different this time.  If you love garlic, you are gonna love this.

Garlicky Chicken
Serves 6 to 8

6 boneless, skinless chicken breasts
4 eggs
3/4 cup water
4 to 5 cups of breadcrumbs
5 cloves of garlic or more to taste
olive oil
butter
1 lb spaghetti
4 Tbsp chopped fresh parsley

Slice chicken into small pieces.  Be careful not to make the pieces too thick because it will take them longer to cook through and the outside breading will get too dark.


Beat eggs, and mix with water.  Dip chicken pieces in egg mixture.  (You may need to add one more egg and a bit more water for your batch.  Have the eggs on hand.)  Then, dredge in breadcrumbs.  Again, you may need to adjust the amount of breadcrumbs to ensure adequate breading for your chicken.  NOTE:  My brother likes to season the breadcrumbs and my mom does not.  You decide for yourself.  That is the joy of being a grown-up.


Melt butter in large skillet with olive oil and garlic.  Notice I didn't provide measurements.  It depends on how large your skillet is, how long you are cooking the chicken, and your personal taste.  You want to make sure the bottom is generously covered and you need to decide if you want more butter than olive oil or vice versa.  Add the garlic after the butter is melted or it will burn.  Brown chicken in garlic seasoned oil and butter.


Set aside on paper towels to drain.  Before you are finished with all the chicken pieces, start cooking pasta according to directions on package.

Once you brown all chicken, add a bit more butter, garlic, and olive oil to skillet.  Before you start, you may want to remove the skillet from the heat and wipe it clean if there is a lot of breading debris in the bottom of the pan.  If you leave it in there, the breading crumbs will turn black and it make your dish look unappetizing.  Heat this long enough to melt butter and slightly brown the garlic.

Heap cooked and drained pasta on a large platter.  Spoon half of the butter, olive oil, and garlic mixture over the pasta.  Add the chicken pieces then drizzle with remaining butter mixture.  Sprinkle with chopped fresh parsley.


Thanks, Mom!

Monday, July 19, 2010

The Day the Brisket Came to Stay

Readers of this blog may recall that my husband and I used a hard suitcase to bring back barbeque beef brisket from our last trip to Texas.  Well, no more, my friends!

As an early birthday present, my husband gave me a Weber Smokey Mountain Cooker and we used it this weekend to smoke an incredibly delicious beef brisket.  Of course, the lack of a smoker was not the only reason we smuggled Texas style barbeque in a meatcase.  We also had not yet found a decent supply of large briskets at a reasonable price.  After some diligent research, my husband found a local supplier and MeatFest 2 was born.  We invited some friends over to try our first homemade smoked brisket.

We started the fire at 6 am on Saturday morning in preparation for an almost 10 hour smoke.  A liberal sprinkling on both sides of kosher salt, coarse ground black pepper, and garlic powder was all the meat required.


It was placed on the grill of the smoker, fat side up, covered, and left alone with the smoke to work its flavorful magic.


Once the meat was done, it was so tender it was hard to remove from the grill.  The smell was so wonderful.  Words cannot do it justice.


I immediately regretted inviting others to share it.  I wanted the brisket all to myself.


As you can imagine, there were no leftovers at all.  Nary a crumble of beef was left on the platter after our feast...


I'm almost sad that there is no brisket left.  I can't wait to smoke another just for the two of us...We have ambitious plans for future smoked briskets.

Saturday, July 17, 2010

You Got Chocolate on My Zucchini

Remember those commercials for Reese's Peanut Butter Cups?  Two people, one eating a jar of peanut butter while walking down the street and the other eating a chocolate bar, would collide.  One would exclaim, "You got peanut butter on my chocolate!"  The other would exclaim, "You got chocolate on my peanut butter!"  They'd take a bite to try the combination, and the voice-over would say, "Two great tastes that taste great together."  And they lived happily ever after...

I thought of that advertisement as I mixed up this bread.  Chocolate and zucchini...what a combination.  I like the summer bounty of zucchini, and I absolutely love chocolate.  You don't normally think about chocolate with your vegetables (or at least I think most people do not - I think of chocolate with everything), but this just works.  Add a touch of cinnamon, and you've really got something to write home about.  Well, I didn't write home about it, I'm writing about it here.  But my folks back home in Texas read this blog, so you get what I mean....

Chocolate Chip Zucchini Bread
Makes 1 loaf

1 1/2 cup flour
1/2 tsp salt
1/2 tsp cinnamon
1/4 tsp baking powder
1/2 tsp baking soda
2 eggs, beaten
1 cup sugar
1/2 cup vegetable oil
1 1/2 cups grated zucchini (about 1 medium zucchini)
1/2 - 3/4 cup chopped pecans (or another preferred nut)
6 oz semi-sweet chocolate chips

Preheat over to 350 degrees F.

Mix together flour, salt, cinnamon, baking powder, and baking soda.


Beat eggs, and add sugar and oil until well-mixed.  Stir into dry mix.

Add grated zucchini.  I prefer it with the peel on because I like to see flecks of green in the bread.


Then stir in chopped pecans and chocolate chips.


Pour into a greased 9x5 loaf pan.  Bake for about an hour or until a tester comes out clean.


Cool in pans for about 15 minutes or so, then overturn onto a rack to finish cooling.


The bread keeps for 2 - 3 days in an airtight container depending on the humidity.  Any longer than that and it gets a bit too mushy.

Tuesday, July 13, 2010

Orzo Salad is Best Served Cold. Like Revenge.

While our grilled London broil was quite tasty with a side of LeBron revenge, we also enjoyed it with a cold orzo salad.  My mother-in-law makes a very delicious orzo salad, and she served as my inspiration when I whipped this up over the weekend.

Orzo is Italian for barley.  Also known as risoni (big rice), it is a form of pasta in the shape of a grain of rice.  I like orzo because it is a versatile pasta that can be served hot or cold, with a sauce, in a soup, casserole, pilaf, or salad, like I mentioned.  While it was originally made from barley, orzo is now made with durum semolina wheat, as especially hard variety of wheat.   Pasta made with durum wheat is more resilient through the cooking process, and won't easily become mushy, even after being baked or simmered in broth.  I used a plain variety of orzo, but you can also find varieties colored or flavored with vegetables, like spinach.

I don't think I tasted orzo until adulthood.  It wasn't unfamiliar to me, but I just cannot recall ever eating it until my twenties.  Too bad for me.

I encourage you not to wait too long before trying it out for yourself.

Orzo Salad
Serves plenty

1 lb dried orzo (plain or flavored will work)
1 pint grape tomatoes, chopped
1 bell pepper, chopped
1/2 cup sliced black olives
2 Tbsp fresh basil, chopped
2 Tbsp fresh parsley, chopped
1/2 cup lemon juice
salt and pepper, to taste
1 1/2 tsp dried oregano
1/4 - 1/3 cup olive oil
4 - 8 oz feta cheese (depending on your preference)

Cook orzo according to package directions.  Drain and mix with chopped veggies and herbs.

Whisk together lemon juice, salt and pepper, dried oregano, and olive oil to create dressing.  Drizzle it over pasta and vegetables and lightly mix.

Add feta cheese and lightly mix.

Monday, July 12, 2010

LeBron Fire

In a time of unsettled loyalties and disappointments, one desires the known, the solid, the dependable.  One desires firecrackers.

I know I should not be surprised by the selfish and narcissistic behavior of someone who refers to himself as King James, but yet I was.  The way in which LeBron James announced that he would be leaving the Cleveland Cavaliers was just unbelievable to me.  He didn't thank the fans, he didn't seem to realize the hurt he was causing.  He just spoke of himself in the third person and made it clear he didn't want the pressure of being a team leader.


I have only recently become a Cavaliers fan and was upset, but my husband and his family and friends in Cleveland felt completely betrayed and were understandably angry.  We decided that something cathartic must be done for them to find relief and satisfaction.  The solution: a bonfire of LeBron James paraphernalia.


As our idea took shape, though, it became so much more.  Oh, so much more...We turned "hey, let's throw some LeBron jerseys into our outdoor firepit and drink beer as we watch them burn" into..."Let's commit LeBenedict Arnold to a firing squad of Roman candles and other incendiary devices while we eat grilled London Broil and homemade ice cream and drink beer."  Yeah, baby...

We started by aiming the Roman candles at his jersey until it was in smoldering shreds...


Then, we moved to pure flame without the flash...


Still had some emotion to express, though...


As you might imagine this became quite the neighborhood spectacle.  If I thought folks were interested in seeing my husband get charged by a small brown poodle...I mean, they were standing in the alley, lining up in their back yards, and leaning out upper floor windows to watch the crazy white folk set fire to LeBron stuff.  Of course, the Roman candles and camera flashes might have had something to do with it...


To get the bitter taste out of our mouths, my husband marinated and grilled a london broil.

Grilled London Broil
Serves 8

4 lb london broil beef
1 white onion, sliced
1/2 cup A1 sauce
1/2 cup Worcestershire sauce
1/2 cup ketchup
salt and pepper, to taste

Between 6 and 24 hours before dinner, place beef in a (non-reactive) glass dish and cover with sliced onion.


Combine A1 sauce, Worcestershire sauce, and ketchup.  Pour over top of beef and onions.


Cover and refrigerate between 6 and 24 hours.


Grill over medium heat for about 15 minutes for medium rare meat.


Let sit for another 15 minutes, then slice and serve with a side of revenge.

Friday, July 9, 2010

The Whole Enchilada

We had quite a bit of smoked chicken remaining from this weekend, and have enjoyed eating leftovers.  We both agreed that chicken enchiladas would be especially nice to make.  Back in Texas, my frequent enchilada order is chicken enchiladas with green sauce, but I'd never made it at home.  I thought it was about time.

I did a little research in my cookbooks and online, but I was not totally satisfied by the recipes we found.  So I decided to just create our own recipe using tomatillos and jalapenos for the green sauce.  Several recipes suggested boiling the tomatillos for the sauce, but I thought roasting would create a better flavor.

What are tomatillos?  Tomatillos are related to tomatoes and in the nightshade family.  It is a fruit surrounded by a husk with a tart flavor.  They are not the same as green or unripe tomatoes.


Here's what we did...

Smoked Chicken Enchilada with Verde (Green) Sauce
Makes 14 enchiladas

1 1/2 lbs of tomatillos, husked
1 white onion, peeled and sliced into large pieces
1 - 3 jalapenos (your preference)
3 cloves of garlic
olive oil for drizzling
1 1/2 tsp cumin
1 1/2 tsp salt
juice of 1 lime
1 1/2 Tbsp olive oil
1/2 white onion, finely chopped
2 cloves of garlic, finely chopped
2 cups of smoked chicken, picked in small pieces
1 1/2 cups sour cream
14 corn tortillas
1 Tbsp canola oil
at least 1 cup Monterey jack cheese, shredded

First, you need to roast the tomatillos, onions, and jalapenos for the sauce.  Place whole tomatillos, whole jalapenos, whole garlic cloves, and roughly chopped onions on a baking sheet.


Drizzle very lightly with olive oil and place in preheated 400 degree F. oven for about 12 minutes.


Transfer roasted fruit and veggies to a food processor, after chopping off the stems of the jalapenos.  Add cumin, salt, and lime juice and pulse mixture until well combined, but still chunky.


Put a generous portion of the green sauce in the bottom of a 9 x 13 glass baking dish with sides.  You will use another generous portion to put on the top of the rolled enchiladas.

Now heat 1 1/2 Tbsp of olive oil in a saucepan over medium heat.  Add onion and cook until soft and carmelized.


Add finely chopped garlic and cook for about 1 more minute.  Now, add chicken and cook until warm and stir until well-blended.  Take off heat, and let cool slightly.  Then, fold sour cream into chicken mixture.


Turn oven down to 375 degrees F.

Now, to get the corn tortillas ready and begin assembly of enchiladas...Lightly heat the canola oil in a cast iron skillet.  Place each corn tortilla in the just warmed oil and make sure both sides are lightly coated in oil.  Then drain over a cooling rack or on paper towels.  You want the oil to soften the tortillas and make them pliable, but not make them soggy with oil.

Once a tortilla is prepped, you want to put about 2 Tbsp of chicken filling in the center (more if your tortillas are larger) and roll it up like a thick cigar.


Place each rolled tortilla in a baking dish with the green sauce on the bottom, seam side down.  My husband recommends rolling against the grain of the tortilla to help them hold together better.  You can kinda see the lines/grain of the tortillas in this picture.


They should fit together snugly.  We got 14 enchiladas in the baking dish.


Once your dish is full, lightly cover with green sauce and shredded cheese.  If you have leftover green sauce, it makes a delicious salsa with tortilla chips.


Bake in the oven for about 20 minutes until bubbly.  You can garnish with more sour cream and even cilantro, if you like.

We served with refried beans and spanish rice, as you would expect in a Tex-Mex restaurant.

Thursday, July 8, 2010

Homemade Cole Slaw

As a side for the smoked chicken, my husband wanted to make some cole slaw.  I convinced him to make the dressing himself and not buy something ready made.  We were all very grateful.

Old-Fashioned Cole Slaw

1 head of cabbage, shredded finely
1 bunch of green onions, finely chopped
1/2 cup finely chopped carrots
1 tsp salt
2 tsp dry mustard
4 tsp sugar
1/2 tsp cayenne, optional
4 Tbsp flour
2 eggs
2 cups heavy cream
1/2 cup white vinegar

Finely shred cabbage.  We used our Oneida Polished Black Mandolin Interchangable Slicer, which is a very useful kitchen tool.


Add chopped green onions and carrots.


Into a double boiler or heavy-bottomed saucepan, add salt, dry mustard, sugar, cayenne, and flour.


Start heating and slowly stir in eggs, cream, and vinegar.


Stir and cook over boiling water or over low heat until slightly thick.


Let the dressing cool and then drizzle over vegetable mixture, stirring well.


Keep covered in the refrigerator until ready to serve.  My husband prefers the slaw after a few hours, so it is an easy side dish to make well before your guests arrive.  Please believe me when I say it is worth the trouble to make the dressing yourself and not just open a jar and pour.