Tuesday, July 13, 2010

Orzo Salad is Best Served Cold. Like Revenge.

While our grilled London broil was quite tasty with a side of LeBron revenge, we also enjoyed it with a cold orzo salad.  My mother-in-law makes a very delicious orzo salad, and she served as my inspiration when I whipped this up over the weekend.

Orzo is Italian for barley.  Also known as risoni (big rice), it is a form of pasta in the shape of a grain of rice.  I like orzo because it is a versatile pasta that can be served hot or cold, with a sauce, in a soup, casserole, pilaf, or salad, like I mentioned.  While it was originally made from barley, orzo is now made with durum semolina wheat, as especially hard variety of wheat.   Pasta made with durum wheat is more resilient through the cooking process, and won't easily become mushy, even after being baked or simmered in broth.  I used a plain variety of orzo, but you can also find varieties colored or flavored with vegetables, like spinach.

I don't think I tasted orzo until adulthood.  It wasn't unfamiliar to me, but I just cannot recall ever eating it until my twenties.  Too bad for me.

I encourage you not to wait too long before trying it out for yourself.

Orzo Salad
Serves plenty

1 lb dried orzo (plain or flavored will work)
1 pint grape tomatoes, chopped
1 bell pepper, chopped
1/2 cup sliced black olives
2 Tbsp fresh basil, chopped
2 Tbsp fresh parsley, chopped
1/2 cup lemon juice
salt and pepper, to taste
1 1/2 tsp dried oregano
1/4 - 1/3 cup olive oil
4 - 8 oz feta cheese (depending on your preference)

Cook orzo according to package directions.  Drain and mix with chopped veggies and herbs.

Whisk together lemon juice, salt and pepper, dried oregano, and olive oil to create dressing.  Drizzle it over pasta and vegetables and lightly mix.

Add feta cheese and lightly mix.

Monday, July 12, 2010

LeBron Fire

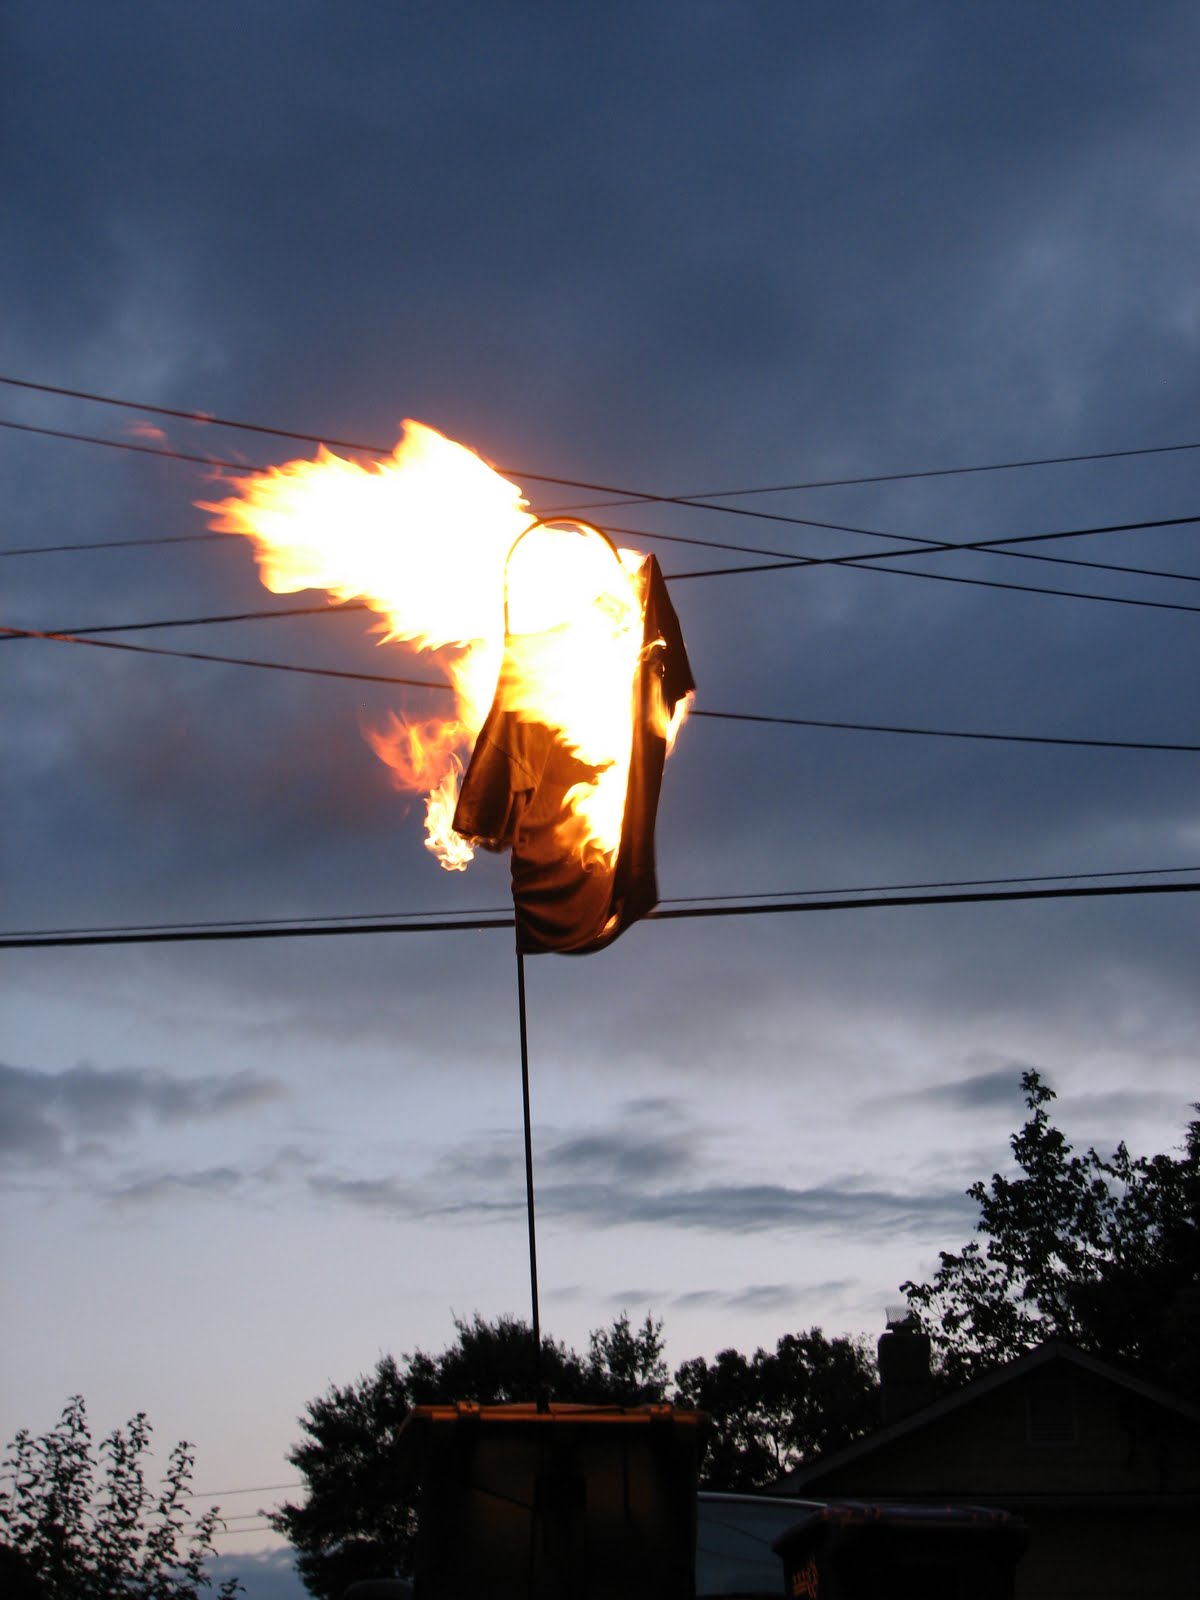
In a time of unsettled loyalties and disappointments, one desires the known, the solid, the dependable.  One desires firecrackers.

I know I should not be surprised by the selfish and narcissistic behavior of someone who refers to himself as King James, but yet I was.  The way in which LeBron James announced that he would be leaving the Cleveland Cavaliers was just unbelievable to me.  He didn't thank the fans, he didn't seem to realize the hurt he was causing.  He just spoke of himself in the third person and made it clear he didn't want the pressure of being a team leader.


I have only recently become a Cavaliers fan and was upset, but my husband and his family and friends in Cleveland felt completely betrayed and were understandably angry.  We decided that something cathartic must be done for them to find relief and satisfaction.  The solution: a bonfire of LeBron James paraphernalia.


As our idea took shape, though, it became so much more.  Oh, so much more...We turned "hey, let's throw some LeBron jerseys into our outdoor firepit and drink beer as we watch them burn" into..."Let's commit LeBenedict Arnold to a firing squad of Roman candles and other incendiary devices while we eat grilled London Broil and homemade ice cream and drink beer."  Yeah, baby...

We started by aiming the Roman candles at his jersey until it was in smoldering shreds...


Then, we moved to pure flame without the flash...


Still had some emotion to express, though...


As you might imagine this became quite the neighborhood spectacle.  If I thought folks were interested in seeing my husband get charged by a small brown poodle...I mean, they were standing in the alley, lining up in their back yards, and leaning out upper floor windows to watch the crazy white folk set fire to LeBron stuff.  Of course, the Roman candles and camera flashes might have had something to do with it...


To get the bitter taste out of our mouths, my husband marinated and grilled a london broil.

Grilled London Broil
Serves 8

4 lb london broil beef
1 white onion, sliced
1/2 cup A1 sauce
1/2 cup Worcestershire sauce
1/2 cup ketchup
salt and pepper, to taste

Between 6 and 24 hours before dinner, place beef in a (non-reactive) glass dish and cover with sliced onion.


Combine A1 sauce, Worcestershire sauce, and ketchup.  Pour over top of beef and onions.


Cover and refrigerate between 6 and 24 hours.


Grill over medium heat for about 15 minutes for medium rare meat.


Let sit for another 15 minutes, then slice and serve with a side of revenge.

Friday, July 9, 2010

The Whole Enchilada

We had quite a bit of smoked chicken remaining from this weekend, and have enjoyed eating leftovers.  We both agreed that chicken enchiladas would be especially nice to make.  Back in Texas, my frequent enchilada order is chicken enchiladas with green sauce, but I'd never made it at home.  I thought it was about time.

I did a little research in my cookbooks and online, but I was not totally satisfied by the recipes we found.  So I decided to just create our own recipe using tomatillos and jalapenos for the green sauce.  Several recipes suggested boiling the tomatillos for the sauce, but I thought roasting would create a better flavor.

What are tomatillos?  Tomatillos are related to tomatoes and in the nightshade family.  It is a fruit surrounded by a husk with a tart flavor.  They are not the same as green or unripe tomatoes.


Here's what we did...

Smoked Chicken Enchilada with Verde (Green) Sauce
Makes 14 enchiladas

1 1/2 lbs of tomatillos, husked
1 white onion, peeled and sliced into large pieces
1 - 3 jalapenos (your preference)
3 cloves of garlic
olive oil for drizzling
1 1/2 tsp cumin
1 1/2 tsp salt
juice of 1 lime
1 1/2 Tbsp olive oil
1/2 white onion, finely chopped
2 cloves of garlic, finely chopped
2 cups of smoked chicken, picked in small pieces
1 1/2 cups sour cream
14 corn tortillas
1 Tbsp canola oil
at least 1 cup Monterey jack cheese, shredded

First, you need to roast the tomatillos, onions, and jalapenos for the sauce.  Place whole tomatillos, whole jalapenos, whole garlic cloves, and roughly chopped onions on a baking sheet.


Drizzle very lightly with olive oil and place in preheated 400 degree F. oven for about 12 minutes.


Transfer roasted fruit and veggies to a food processor, after chopping off the stems of the jalapenos.  Add cumin, salt, and lime juice and pulse mixture until well combined, but still chunky.


Put a generous portion of the green sauce in the bottom of a 9 x 13 glass baking dish with sides.  You will use another generous portion to put on the top of the rolled enchiladas.

Now heat 1 1/2 Tbsp of olive oil in a saucepan over medium heat.  Add onion and cook until soft and carmelized.


Add finely chopped garlic and cook for about 1 more minute.  Now, add chicken and cook until warm and stir until well-blended.  Take off heat, and let cool slightly.  Then, fold sour cream into chicken mixture.


Turn oven down to 375 degrees F.

Now, to get the corn tortillas ready and begin assembly of enchiladas...Lightly heat the canola oil in a cast iron skillet.  Place each corn tortilla in the just warmed oil and make sure both sides are lightly coated in oil.  Then drain over a cooling rack or on paper towels.  You want the oil to soften the tortillas and make them pliable, but not make them soggy with oil.

Once a tortilla is prepped, you want to put about 2 Tbsp of chicken filling in the center (more if your tortillas are larger) and roll it up like a thick cigar.


Place each rolled tortilla in a baking dish with the green sauce on the bottom, seam side down.  My husband recommends rolling against the grain of the tortilla to help them hold together better.  You can kinda see the lines/grain of the tortillas in this picture.


They should fit together snugly.  We got 14 enchiladas in the baking dish.


Once your dish is full, lightly cover with green sauce and shredded cheese.  If you have leftover green sauce, it makes a delicious salsa with tortilla chips.


Bake in the oven for about 20 minutes until bubbly.  You can garnish with more sour cream and even cilantro, if you like.

We served with refried beans and spanish rice, as you would expect in a Tex-Mex restaurant.

Thursday, July 8, 2010

Homemade Cole Slaw

As a side for the smoked chicken, my husband wanted to make some cole slaw.  I convinced him to make the dressing himself and not buy something ready made.  We were all very grateful.

Old-Fashioned Cole Slaw

1 head of cabbage, shredded finely
1 bunch of green onions, finely chopped
1/2 cup finely chopped carrots
1 tsp salt
2 tsp dry mustard
4 tsp sugar
1/2 tsp cayenne, optional
4 Tbsp flour
2 eggs
2 cups heavy cream
1/2 cup white vinegar

Finely shred cabbage.  We used our Oneida Polished Black Mandolin Interchangable Slicer, which is a very useful kitchen tool.


Add chopped green onions and carrots.


Into a double boiler or heavy-bottomed saucepan, add salt, dry mustard, sugar, cayenne, and flour.


Start heating and slowly stir in eggs, cream, and vinegar.


Stir and cook over boiling water or over low heat until slightly thick.


Let the dressing cool and then drizzle over vegetable mixture, stirring well.


Keep covered in the refrigerator until ready to serve.  My husband prefers the slaw after a few hours, so it is an easy side dish to make well before your guests arrive.  Please believe me when I say it is worth the trouble to make the dressing yourself and not just open a jar and pour.

Wednesday, July 7, 2010

What A Smokin' Holiday

I must have been a good girl this year because as an early birthday present my husband gave me a smoker.  Yeah, you read that right...a Weber Smokey Mountain Cooker to smoke meat and other goodies.

For our inaugural smoked meat feast, we decided to smoke some chicken.  Since folks had Monday off from work, we thought it would be a good day to share.  We invited my brother and his girlfriend, Kate and our friends Dave and Wendy to join us.

Smoked Chicken
Serves 8 to 12


3 whole fryer chickens (3 to 4 lbs each)
48 oz Goya brand mojo criollo
kosher salt and freshly ground black pepper, to taste
1/2 cup canola oil

Between 6 and 8 hours before dinner, split the chickens and get them ready for the marinade.  To split a chicken - lay the chicken breast-side down on a cutting board.  Using heavy-duty kitchen shears or a sharp knife, cut down both sides of backbone.  Flip the chicken over, so the cut section is down.  With your hands, push against the breast to crack it open.  Use the kitchen shears or knife to cut through the breast and finish splitting the chicken.  You also want to break up the leg joint.  Grip the thigh firmly, then bend or twist the legs on each half until you hear or feel the break at the joint between the leg and the thigh.

Now you are ready to marinate the chicken halves.  Use one-gallon zip-top plastic bags or glass dishes to marinate the chicken, no metal containers.  Place chicken in the preferred container, shake the marinade bottles well, and then pour over chicken.  Put it in the refrigerator covered for 4 to 6 hours, turning once or twice to distribute the marinade.


Two hours before dinner, start a fire in your smoker.  We used a chimney starter to help get it going and used a mix of lump hardwood charcoal and mesquite wood chunks.


While you are waiting for the charcoal in your starter to engage, pat the chicken dry and brush with 1/2 cup oil.  Season lightly with salt and pepper.


When the lit charcoal and wood are ready for cooking, arrange the chicken on the grate.  Place the chicken halves in a circle, breast-side in, on the grate, as close to the middle as possible without crowding.  We put two halves of chicken on the bottom grate and four halves on the top grate.  Put on the lid.  The top and bottom vents of the cooker should both be open, but adjust them by closing slightly if the temperature gets too hot.  You want to shoot for 250 to 275 degrees F.  It was hot enough outside that it impacted the heat of our cooker so much we needed to adjust the vents.


Arranging the chicken on the grate with the breast away from the hottest zone on the grate to protect the breast meat from drying out and help the meat cook more evenly.  On the Weber Smokey Mountain cooker, the perimeter of the grate is hotter because heat flows around the water pan and up the sides.  Hence, breast side in.  Leave the lid on for 1 1/2 hours.  No peeking or you will slow down the cooking.

One and one-half hours into the cook, open the lid and puncture the thickest part of the breast with a fork.  If the juice running out the chicken is clear, it is done.  If the juice is still pinkish, leave the chicken on the cooker and replace the lid and fork-test the chicken every 10 to 15 minutes until the juices run clear.  The chickens on the top were done in one and a half hours and the bottom chicken was done about 15 minutes later.


As a guide to the joys of our new smoker, we've been using the cookbook, Low and Slow: Master the Art of Barbeque in 5 Easy Lessons.  It includes the above recipe.