Friday, April 29, 2011

Bar Stool Fridays - Sands of Laredo Cocktail

On New Year's Day 2011, my husband and I helped my parents move their belongings and pets from Brownsville to Laredo,  Texas.  We followed the Rio Grande north on US Highway 83 past the edge of Mexico's Chihuahuan Desert and over the infamous Falcon Lake.


While I didn't grow up in South Texas, a number of significant life events for our family have occurred while my parents lived in the Brownsville area.  And we have so many close friends and loved ones that it was bittersweet to help them make the move.  I must admit, I was disappointed when they initially moved to Brownsville, even though I was already living on my own, but I grew to feel at home there.  I'm excited for my parents' new adventure, however, and my husband and I are eager to become more familiar with another part of Texas.  I'm sure we will grow to love it, too.

Driving to Laredo, as it is all along the Rio Grande corridor where Texas and Mexico meet, I could see that the border is just arbitrary.  The history, food, and culture of Texas and Mexico are so intertwined (and the river can run so low) that it is difficult to see the so-called border.  You can't really tell one side from the other or where one begins and the other ends.  Well, except for markers like this...


Or the border fence.  But, that is an entry for another day...

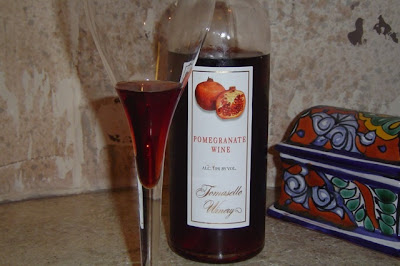
So close to the Chihuahuan Desert, Laredo has a semi-arid climate, and they've been suffering with unusually high temperatures this spring.  Needing a refreshing and thirst-quenching drink for their Easter celebration, my father came up with a cocktail using pomegranate wine.  When he finished composing the drink, it looked rather sandy colored, so he named it the Sands of Laredo.  But, I think the name is also fitting because you can't tell where one ingredient ends and the other begins.  Each ingredient is improved by mixing with the others.  It is a real borderland gem.  Thanks for sharing it, Dad.

Sands of Laredo
Makes 1 drink

Pomegranate wine
sparkling wine/champagne
orange juice

All ingredients should be chilled.  In a tall fluted glass pour about 1 1/2 oz of pomegranate wine.


Top the glass with equal amounts sparkling wine/champagne and orange juice.


Wednesday, April 27, 2011

When Life Gives You Icky Sugar Cookies...Make Lemon Pie!

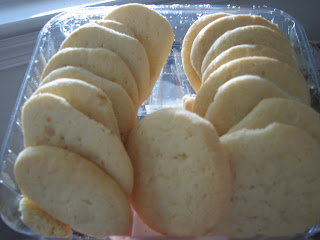
You know those boxes of cookies you see in the grocery store bakery?


Well, I don't like them.  I know that some people must like those cookies though, because I witness them being purchased, and I see them at potluck parties.

A box of these cookies showed up at a party that my friend Kate attended last weekend, and no one touched them.  Okay, maybe one person touched them because the box was short one cookie.  Anyway, the party ended and there sat a nearly full box of cookies.  It seemed wrong somehow to Kate, and the sweet and clever girl that she is, she brought them home.  She knew that we could see to it that those cookies served a better purpose...a higher purpose.


And, you know what?  I think we did.

Lemon Icebox Pie with Sugar Cookie Crust
Makes one 9-inch deep dish pie

Crust:
box of stale grocery store sugar cookies
7 Tbsp butter

Filling:
4 egg yolks
2 cans sweetened condensed milk
1 cup lemon juice

Meringue Topping:
4 egg whites
1/2 tsp cream of tartar

Preheat the oven to 325 degrees F.

Start with the crust.  You want to reduce those not-so-great cookies into crumbs.  I used my food processor, but you could also put them in a sealed zip-top plastic bag and pound on them with a rolling pin.


You need to finish with 3 1/2 to 4 cups of cookie crumbs.  Dump those crumbs in a bowl.


Melt the butter and add it to the crumbs.


Stir to combine.


Press the buttery crumbs into a deep-dish pie pan with your fingers.  Evenly distribute the crumbs to cover the entire inside of the pan.


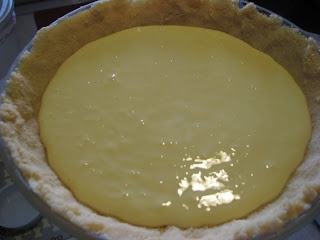
Now for the filling...Separate the eggs by putting the yolks in one bowl and the whites in another.  Add sweetened condensed milk and lemon juice to the bowl with egg yolks.  Blend well - I used a handheld electric mixer.


Pour the filling into the cookie crumb crust.


Finally, on to the topping.  Take the 4 egg whites you set aside, and sprinkle them with cream of tartar.  The cream of tartar helps make your egg whites more manageable.  Using clean beaters for your handheld electric mixer, beat the egg whites until stiff glossy peaks form.


Spread the whipped egg whites onto the lemon filling.


Bake for about 15 to 20 minutes until the meringue is lightly browned.  Cool completely before slicing.


The pie keeps for 3 to 4 days in the refrigerator.

VARIATION:  I made meringue, but you could top your pie with whip cream instead.  Just bake the filling and crust for about 15 minutes.  Let it cool and then spread with whipped cream.

Tuesday, April 26, 2011

Eggscellent Mistake

My brother requested an angel food cake for Easter, and I said, "sure, no problem."  Well, I ended up doing more than I expected on Saturday, and I scrambled to get the ingredients at the grocery store in a moment in which I was both hungry and tired.  Not such a good plan.

I thought I could save time by getting a carton of egg whites, but in my rush I didn't read the side panel.  If I had taken the time to use my literacy skills I would have seen that this particular carton of egg whites had been pasturized to a degree that made it unusable for my purposes.  And, to make it better, I elected not to read that detail until after I had the cake in the oven.  Sigh.

Much to my brother's disappointment, there was no angel food cake for Easter.  Apparently, the homemade Peeps and peanut butter cups were not enough when he had his heart set on a light white cake with fluffy white frosting.

I put a raincheck on baking another cake, but there was still half a carton of egg whites to use.  This need combined with my husband's request for a light dinner, led me to make a spinach and egg white quiche.

Spinach and Egg White Crustless Quiche
Serves 4

cooking spray
1 package frozen spinach
2 cups egg whites
1/4 cup milk (whole, low-fat or no fat okay)
1 - 1/2 cups shredded cheese (I used Monterey Jack)
1 clove garlic, minced
salt and pepper, to taste
hot sauce, optional

Lightly coat a pie plate with cooking spray and set aside.  Preheat oven to 350 degrees F.

Thaw spinach in microwave (don't cook) and squeeze out liquid with your hands.  Combine thawed spinach with all other ingredients in a bowl and mix well.


I also threw in about a quarter cup of sauteed mushrooms and onions that were leftover from burger night.  This could be a good dish to use other leftover bits (meat and/or vegetables) and stretch them into another meal.

Pour into prepared pie pan and bake for about 40 minutes, or until liquid has set in center.


Cool slightly, slice into wedges, and serve.

Saturday, April 23, 2011

Helping Out the Easter Bunny

The Easter Bunny is really slammed this time of year.  His to-do list goes on for pages, his calendar is jam-packed, the battery on his smartphone won't stay charged, he's bitten his nails down to nubs, and the poor little fellow has circles under his eyes from lack of sleep.


I figured he could use a hand...or is it paw?  Anyway...I knew I could help, at least when it came to supplying the Easter baskets of some of my friends and family.  I was also pretty sure I could do better than the bagged candy I see in the store.

Now, my husband loves peanut butter and chocolate and really scarfs up the Reese's Peanut Butter Cups, so I know the Easter Bunny was planning to give him some again this year.  But, what if I made them instead...And, what if I made them more suitable for adult palates and used dark chocolate? And how could I forgot the bourbon?  Hmmm...what if?

Peanut Butter Cups for Grown-Ups
Makes about 2 dozen miniature cups

1 cup peanut butter
1/2 cup powdered sugar
1 tsp vanilla extract
3 tsp bourbon
3 - 4 cups dark or semi-sweet chocolate chips (premium is best)

I used a miniature muffin tin lined with paper cups as my molds.  Prepare this in advance so it is ready to go when your ingredients are.


In a bowl, combine peanut butter and powdered sugar.  When you have a smooth, uniform mixture, add the vanilla extract and bourbon.  Stir to blend well - it should be a pretty thick mixture that is firm enough to form into balls.  You may need to add just a tiny bit more powdered sugar, if it is too soft.


Take about 2 to 3 teaspoons worth of peanut butter and using your hands roll into a ball.  Then, lightly press into a patty/saucer shape.  Place the formed balls onto a wax paper surface, and repeat until you have about 24 balls.  You may need to adjust the patties so they are all about the same size.


Now to melt the chocolate.  If you don't have a double boiler, then set a heat-proof bowl over a pot of boiling water.  Turn down the heat to low and add the chocolate to the bowl.


Stir gently as it melts.  It should only take a few minutes to completely melt.  Turn off the heat and now the chocolate is ready to turn into candy.


Take a muffin liner paper, and add a spoonful of chocolate.  Then, using back of your spoon, spread the chocolate around so that it completely coats the inside of the paper cup.  Once it is coated, set it back into the muffin tin.  Repeat until all the cups are completely lined with chocolate.  You need to move very quickly before the chocolate firms up again.


Now, drop in the peanut butter patties, and press down very gently.  You don't want them to push through the chocolate, but just be flattened a little bit.


Still working briskly, add another spoonful or more of chocolate to each cup in order to cover the peanut butter filling.  Use the spoon again to spread the chocolate around the top and completely cover the peanut butter.


Set the finished cups back into the muffin tin and let firm up at room temperature for about four hours.


Store up to two weeks (as if they will last that long) in an airtight container.  Don't refrigerate.


Friday, April 22, 2011

Barstool Fridays - New Belgium Beer and A Quiver of Bacon

Intrigued?  Hope so!

I was recently selected to be a part of the FoodBuzz Tastemaker Program for New Belgium Brewing Company.  FoodBuzz is encouraging its bloggers to create recipes using or to be matched with New Belgium Beer.  Well, I really enjoy New Belgium's offerings so I couldn't turn down this opportunity.  Unfortunately, it is not currently available in the mid-Atlantic region where I reside.  It is available in my home state of Texas, though, and with the kind assistance of my beer-loving parents I was able to secure some for my use.  Thanks to FoodBuzz, New Belgium and, of course, Mom and Dad!

New Belgium Brewing

In the mood for spring, I elected to focus on their spring seasonal, Mighty Arrow Pale Ale.  It is pleasantly hoppy with honey malt undertones.


And, here's my favorite part...it is brewed as a tribute to the founder's dog, Arrow, a Border Collie mix.  I love the idea that a beer is made to honor a dog.  My dog, Charley, does, too.  I'm pretty sure he hopes to be on a beer label someday.


I decided to experiment with creating a beer cocktail.  And, bacon has been on my mind a lot lately, so I thought why not combine the two?  In fact, my mom encouraged me to try to create a BLT beer cocktail.  Hence...

A Quiver of Bacon or the Mighty Arrow BLT Beer Cocktail
Makes 1 drink


2 slices bacon, for garnish
3 - 4 croutons, for garnish
1 oz bacon vodka (yeah, that's right...I'll give you directions, look at the end of the entry)
1/2 oz lettuce juice (don't worry...I'll tell you how to do that, too)
3 oz tomato juice
2 - 3 dashes hot sauce
salt and pepper, to taste
6 oz beer

Fry bacon until crisp, drain on paper towels.


(As I started to fry the bacon, Charley moseyed into the kitchen to watch me carefully.  He is a pretty constant kitchen companion, and is a big fan of bacon.)

Cube slightly stale bread into croutons.


Lightly brown the bread cubes in bacon grease.  Drain on paper towels.


In an ice filled shaker, add bacon vodka, lettuce juice, tomato juice, hot sauce, and salt and pepper.  Shake well.  Pour into pint glass, and pour beer on top.  Garnish with bacon and croutons, and serve.


Charley hopes you'll share your bacon with a furry friend...


Bacon Vodka

To make bacon-infused vodka, I used a technique known as fat-washing.  I poured bacon fat into vodka, stirred, and then put it in the freezer.

To recreate, fry bacon and save the grease.  I've found that I can get about 1/2 cup of bacon fat from frying about a dozen pieces of bacon.


Figure out how much vodka you want to flavor and then determine how much grease you need to add.  I think for each ounce of vodka that you want to infuse, you should add at least 1/2 tsp of bacon grease.  Just pour that fat on in there and you will see that it pretty quickly separates.


Stir it up, cover well, and put in the freezer for at least 12 hours.  It will separate again and the fat will solidify in the freezer making it pretty easy to remove.


So, scrape out what fat you can and then strain the rest.  I used a paper towel lined sieve to help catch all the fat residue.


Now you are ready to use the vodka to make your Mighty Arrow BLT beer cocktail.


Lettuce Juice

This is really easy, too.  I just blitzed a few lettuce leaves in a food processor with a splash of Mighty Arrow beer.


For me, 6 or 7 leaves of lettuce with a couple of splashes of beer made about 3 ounces of lettuce juice.


Thursday, April 21, 2011

Friends Don't Let Friends Eat Stale Marshmallows

I hate Peeps.  However, I have several friends that seem to adore them.  I cannot in good conscience let this behavior continue.  I feel obligated to provide them a quality product.  I mean, Easter only comes once in a year, why waste good sugar on bad candy?

Taking matters into my own hands, I decided to craft a homemade version of those stale, artificial tasting creations...


Homemade Peeps
Modified from The Kitchn

cooking spray
3 packets (each packet is typically about 2 1/4 tsp) unflavored gelatin powder
1/2 cup, plus 2 Tbsp cold water
1 Tbsp lemon extract
6 - 10 drops of yellow food coloring (depends on how vivid you want your candy)
3/4 cup water
1 1/4 cup light corn syrup
pinch of salt
1 1/2 cups granulated sugar

Let me start this recipe by telling you that you need a stand mixer with a whisk attachment to do this.  The handheld mixer will not be powerful enough.

Spray a 9 x 13 baking pan with cooking spray, ensuring that there is a thin film of spray on every inner surface and corner.  Set aside.


Now you need to bloom the gelatin, or prepare it for use.  Gelatin needs to be pre-moistened to prevent clumping in your recipe.  I just do this in the bowl of my mixer, removed from the base.  Add the 1/2 cup + 2 Tbsp of cold water and lemon extract to the bowl and sprinkle in the 3 packets of powdered gelatin.


Whisk the powder and water together with a fork to break up clumps.


It will start to resemble the consistency of applesauce, this expansion earns it the name of blooming.  I add the drops of yellow food coloring at this point, but you don't need to stir it in yet.  Then, attach the bowl to base of mixer and move on to next step...

Combine the 3/4 cup of water with the corn syrup, salt, and sugar in a 4-quart saucepan.  Cook on medium heat on stovetop and bring to boil.


As it is coming to a boil, you will notice sugar crystals forming on the sides of the pot.  This can make your mixture gritty, and you have a couple of ways of counteracting this.


You can wet a pastry brush in warmish water and brush it down the sides of the pot to dissolve the sugar crystals.  Or, you can just cover the pan for 2 minutes once it starts to boil and the steam can wash the sides of the pot.   Do not stir the sugar mixture once it starts to boil, however, or it may crystallize further.

Now clip on a candy thermometer to the side of the saucepan and continue to boil the sugar mixture until it reaches 245 degrees F.


Turn off the burner and remove the candy thermometer.  Turn on the mixer to medium speed with the whisk attachment, and then using hot pads to protect your hands, slowly and carefully pour the hot sugar syrup into the bowl of gelatin.  The mixture may foam a little so just take your time adding the syrup.


When all the syrup has been added, cover the bowl with a towel and increase the mixer speed to high.  I use the towel to prevent any sticky splatters in my kitchen.


Whip for 10 - 12 minutes, until it looks like glossy meringue.  Check on the mixture a couple of times during this period and you can add any extra food coloring now if you need it, while the whisk is still turning.

Turn down the mixer speed to medium low and slowly lift the arm of the mixer so that some of the marshmallow mixture can spin off into the bowl.


Turn off the mixer completely and using a stiff silicone spatula scrape the marshmallow mixture into your greased pan.  It will be very stiff and sticky.  Try to work quickly before it starts firming up.

Lightly moisten your fingers with water (so the marshmallows won't stick) to smooth down the top and even out the mixture within the pan.  Let it sit uncovered for 12 - 15 hours to completely set and cure.


Once your marshmallows have cured, turn them onto a cutting board.


You can cut them into squares with a sharp knife, or use holiday cookie cutters, like I did.  I chose a bunny and chick.


NOTE: Cookie cutters will not likely use every single inch of your marshmallows, so you can trim the remainders into square shapes so as not to waste any goodies.

Marshmallows typically need to be coated in a mixture of (1 1/2 cups powdered sugar and 1/2 cup cornstarch) so they will not stick together when stored.  To make Peeps, I modified this recipe slightly.  First, I took about 1/2 cup granulated sugar and blended in about three drops of yellow food coloring.


I always have some marshmallow mixture on  hand stored in a lidded plastic container, so then I added about 2 Tbsp of that to my yellow granulated sugar and mixed well.  I used this yellow sugar mixture to coat my homemade Peeps.


These Peeps will keep in an airtight container at room temperature for several weeks.  Leftover marshmallow coating can be stored in an airtight container indefinitely.