Showing posts with label Dad. Show all posts

Thursday, September 9, 2010

Guest Post: Remembering the Spiced Peaches of Life

I'm lucky to come from a family of cooks.  I'm also lucky to be supported in my blogging efforts by a large circle of family and friends, including my parents.  Turning the attention to them, I'm thrilled to share another guest post with you.  This post on spiced peaches is from my dad with help from my mom.


Recently while on an extended weekend to the Hill Country of Texas we acquired a 1/4 bushel of peaches in Fredericksburg, Texas.

Since we had more fruit than we could reasonably eat, we decided to put up some Spiced Peaches like my mother and I did when I was growing up.
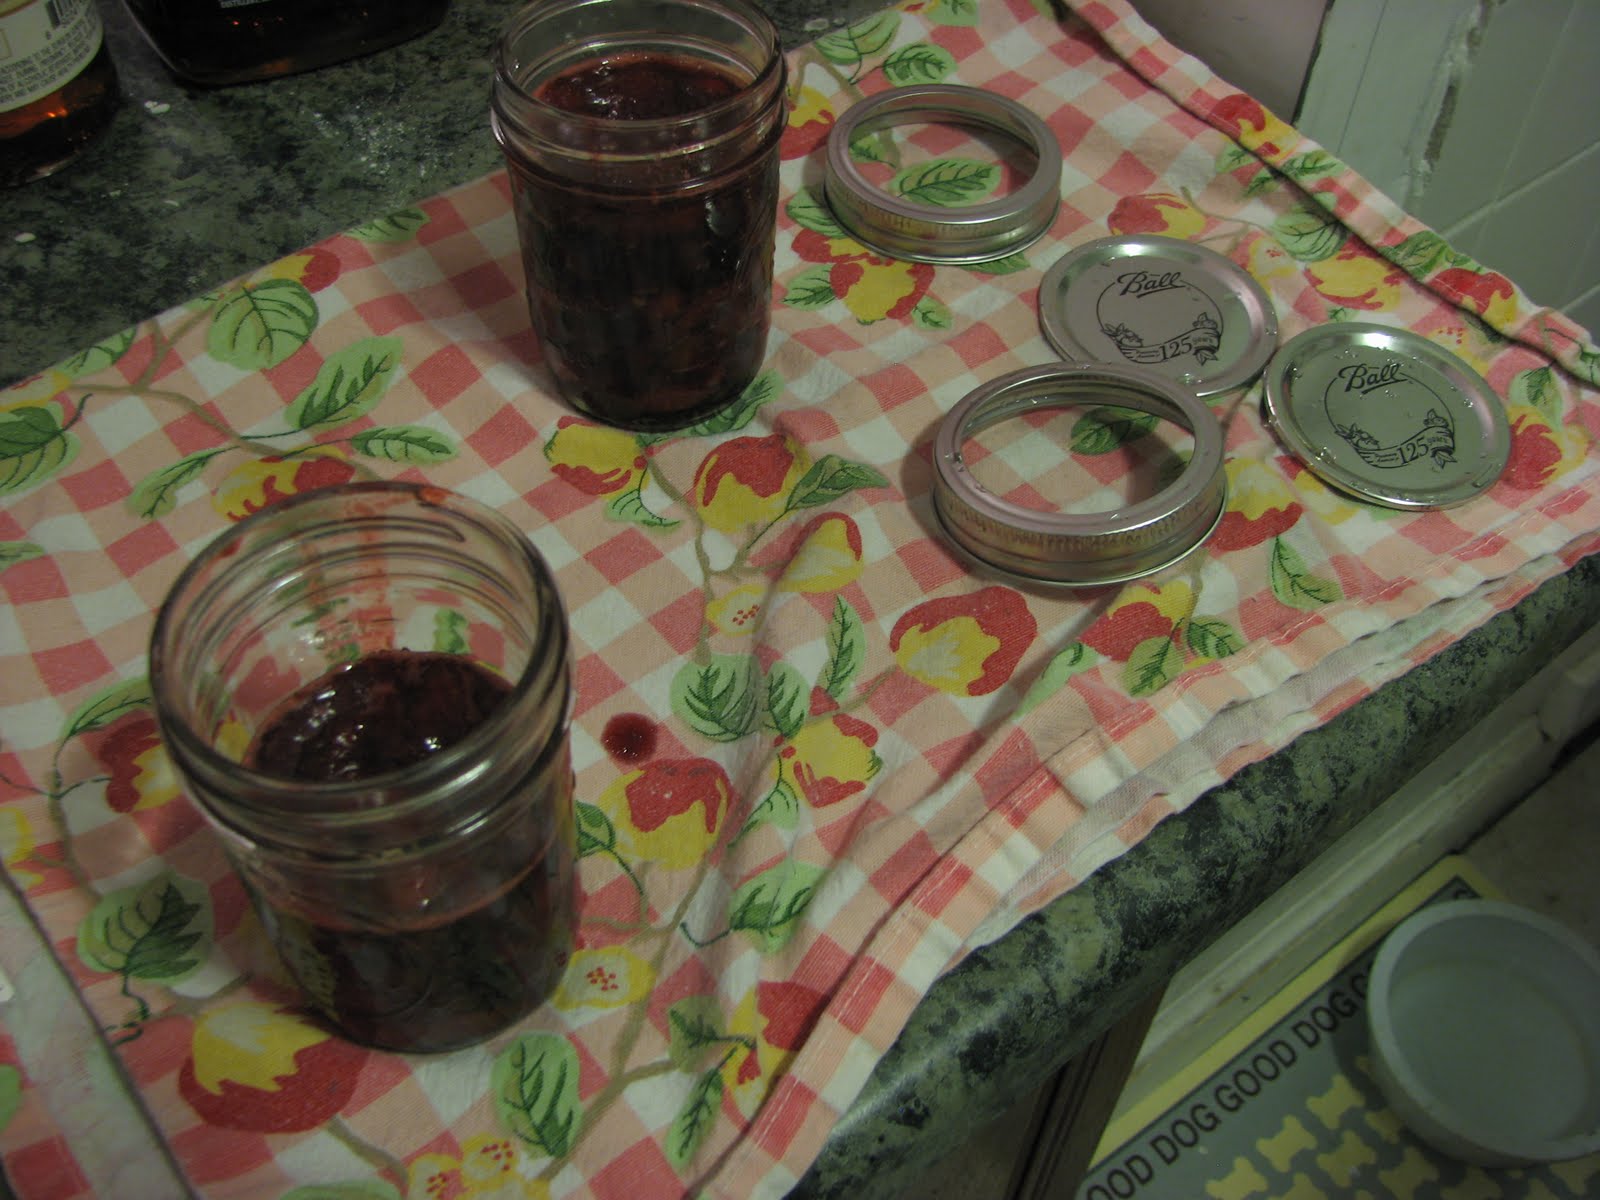


Spiced Peaches


First, you need to peel the peaches and the easiest way to do this is with a water bath. Fill a large pot around 3/4 full with water and bring to a boil. Slowly and carefully put the peaches in the water until no more peaches can be submerged. Boil for 3 to 5 minutes and then quickly put under cool running water to stop the cooking and cool the fruit so it can be handled. The skins will slide right off the peaches, and you can put the cleaned peaches in a bowl to set aside.


In a large sauce pan, mix the following ingredients and bring to a boil, taking care not to let the pot boil over.

5 cups sugar
2 cups water
1 cup vinegar
12 sticks cinnamon, broken
2 tsp. whole cloves

Once the syrup is prepared turn to a simmer and prepare the water bath and jars.

Fill hot water bath canner about half full and begin heating.  Check jars for nicks, cracks on sealing surface.  Wash jars in hot soapy water, rinse, let soak in hot water or wash in dishwasher and let them remain in hot dishwasher.  Also wash, rinse, and let lids and rings remain in hot water until ready to use.

When the jars are ready, bring the syrup to a boil and carefully drop the peaches in the syrup.  Heat peaches in syrup about 5 minutes. 


Pack hot fruit in hot, clean jars; add syrup to within 1/2 inch of top of jar (I like to include a piece of cinnamon and some cloves in each jar), wipe any residue on top and threads of jar (residue could prevent a good seal); place hot, clean lids and rings on jars, screw the ring tight but do not force, and place in water bath canner.  When canner is full, add enough hot water to cover jars with 1’’ - 2’’ of water.  Bring water to a boil, reduce to a gentle boil and begin counting processing time.  The processing time for pint jars is is 20 minutes and for quart jars is 30 minutes.


After the appropriate time, remove jars from canner and place on racks to cool. Do not place hot jars in a cool draft since that could cause jars to crack. Do not tighten rings.  After 12 hours and then after 24 hours, check for seal.  Press center of lid, if it is down in the center then it is sealed. Or tap the center of the lid, a clear ringing sound means it is sealed. Do not tighten ring after jar has cooled.


Seven pounds of peaches will yield about 9 pints.

Better Homes and Gardens Cook Book, 1968
Ball Blue Book


Thursday, May 27, 2010

Spoonful of Summer

Every summer when I was growing up, my father and grandmother would make jam and preserve fruits and vegetables with me as their assistant.  I must admit that while I enjoyed spending time with them in the kitchen and I absolutely loved the results - I thought the task of canning itself was a big pain.  So many steps...and it made our Texas kitchen so very, very hot and steamy, especially my grandmother's farm kitchen with no air conditioning.  Brutal.

Fast forward many years...I've not been able to find a replication of that spoonful of summer that I could find in my family kitchens.  You just can't beat jars of jam made at home with freshly picked fruit.  Well, I decided to resolve that.  Conveniently, I had just brought home over 10 pounds of strawberries I picked myself.


The goal was to can our own fruit this summer.  First step - find mason jars and lids.  This is harder than you'd think (or at least harder than I thought) in urban Washington, DC.  My husband, my hero eventually found them early Sunday morning in a neighborhood hardware store, hidden away and high on the shelf after we made several stops the day before with no success.  We also elected not to make jam, but to try something with a bit less sugar.

Monday night, my husband and I made fresh strawberry preserves.  Yes, it made our kitchen very hot and steamy, but it wasn't as much labor as I remembered from my childhood.  Plus, it made our kitchen smell just wonderful.   I was inspired to get up and make biscuits the next morning just so we would have something on which to use the lovely red preserves.

We experimented with our recipe, and plan to make more batches in the future.  In the meantime, I thought I'd share with you what we made in this round.

Homemade Strawberry Preserves
Made six 8 oz. (half pint) jars

8 cups of fresh strawberries
4 cups of sugar
juice and zest of one orange

Combine the strawberries and sugar in a large pot and heat slowly until the juices are no longer cloudy.  It took about 5 minutes.  Remove from the heat and stir in the lemon juice and zest, then cover loosely and let stand for a few hours to macerate or pull out the sweet juice of the fruit.


While waiting, bring a large pot of water to a boil to sterilize the jars and lids.  Let them stay in the boiling water for at least 5 minutes.  Turn off the heat, but leave the jars and lids in the water until you are ready to use them.

In order to help you test the doneness of the preserves later in the process, put a small plate in your refrigerator to start it chilling.

Once the fruit is nice and juicy, scoop out 2 cups worth into a large skillet and begin cooking them over medium high heat.  When the strawberries start to simmer, start stirring regularly and let them cook about 6 minutes.  You should really smell the orange combining with the strawberries at this point.  Mmmm...wonderful.


Turn off the heat and give them a test for doneness.  Take that small plate out of your refrigerator and dribble a bit of the liquid on the plate (no more than 1/4 tsp).  Let this plate sit in the freezer for 30 seconds, pull out, and swipe your finger through the puddle.


Your finger swipe will part the liquid and expose the plate underneath.  If it starts to run together immediately, it isn't done.  So, turn the heat back on and cook for a few more minutes, then try the test again.  Our batches averaged about 8 minutes.

When you get the preserves to the right consistency, they are ready for jars.  Ladle the jam into sterilized jars, filling to within 1/4 inch of the rims.


Cover each jar with a lid and fasten the ring tight.  Set aside and repeat the process with the remaining strawberries and juice.  I found it easier to control the heat and things went faster if I made them in small batches of 2 cups at a time.


Once you've filled all the jars, put them back into boiling water, making sure they are completely submerged.  Cook for about 10 minutes and then lift the jars from the bath.  As they cool down, you should hear a pinging noise as the lids pop from a vacuum forming.  After a couple of hours, press down on the center of each lid.  There should not be any flex.  If the lid flexes, repeat the process and re-submerge the jars in boiling water for 10 minutes to reach the vacuum seal.

Monday, May 24, 2010

Suitcase Meat

On our trip to Texas in April, my husband and I decided to bring back some of the foodstuffs that we can't get here in DC.  The most important item for us was barbeque beef brisket.  Not only can we not get large beef briskets at good prices, but we also don't have a smoker.  We had a craving as we had not had good barbeque since our wedding in October, and our friends were clamoring for us to bring some barbeque back.

So, on the first day of our trip, we purchased a 12 pound beef brisket at HEB.  My dad seasoned it and smoked it for several hours over mesquite wood.


Then, we wrapped the cooked brisket carefully and placed it in the freezer it for the remainder of our trip.  The next step was insuring safe passage and TSA allowance.  After several hours of research and a call to the airline, we decided that we would wrap the brisket in plastic, pad it with styrofoam, and pack it in a hard-sided suitcase.  With a trip to Goodwill, we scored a large American Tourister suitcase for 9 bucks.

We made sure it was frozen solid before packing and well insulated and padded for travel.  I was a nervous wreck for the entire trip home.  We decided to check the hard-sided meat suitcase.  I was sure that TSA was going to have a problem with this large mass of aluminum foil and plastic wrap, and our brisket was going to be confiscated.  We didn't get called back from the gate, so once we boarded the plane I focused my anxiety on the thoughts that the meat suitcase wasn't going to make the connecting flight and our plans for a barbeque feast would be crushed.

Well, I'm thrilled to report that the brisket made it safe and sound.  With all the insulation, it stayed frozen through our extended trip to our great relief.  We popped it in our freezer and began planning the special feast in which we would share the brisket with our friends.

We hosted a small dinner for a few friends this weekend to serve the special suitcase meat.  I'd never frozen barbeque before, so I wasn't quite sure how to reheat it.  We knew we would use the oven to warm it, but we wanted to be careful not to dry out the meat.  It was fully cooked, we just wanted it warm for serving.  After a bit of debate, we landed on a strategy.


We defrosted the large brisket for two days in the refrigerator.  About two hours before we wanted to eat, we unwrapped the brisket and put in a roasting pan.


It smelled absolutely wonderful with spice and mesquite smoke, and I had dogs pacing at my feet as I unwrapped it.  I combined two cups of beef broth with some of the secret spices I would have put on a brisket to barbeque, and poured it over the meat and let it pool in the bottom of the roasting pan.


Then, I covered it with foil, making sure that it was tightly covering the ends so that they would not dry out too much.  I put it in a 225 degree F oven for almost two hours.  When it was warm enough for us, my husband carved the meat and my brother started grabbing before I could take a picture.  They didn't give me a chance to take a composed picture, but I think it looks darn good.  And, it was very tasty. 

Mmmmm.....

Friday, May 21, 2010

Smoke Gets In Your Eyes

Our tour of the whiskey distillery got me thinking about wood.  No, not that kind of wood.  I mean, how wood instead of peat can be burned so smoke flavors the malt and wood chips are used to age and flavor the spirits.  It reminded me of the importance of smoke in barbeque. 

Even though barbeque meat is seasoned with spice rubs, basted or mopped with liquids, and plunged in sauce, its dominant flavor is smoke.  Depending on the wood burned, the smoke can be sweet or acrid, fruity or resinous.  The word barbeque even comes from the Spanish word barbacoa, which means a grid of green (fire resistant) sticks on which food is placed high above a fire to smoke.

Hardwoods have sugar molecules that produce aromas and proteins which contribute to roasted flavors.  Most softwoods, like pines and firs, have significant quantities of resin that produce a harsh tasting soot when burned.  This is not preferential for smoking food.  So, don't use your Christmas tree in the barbeque pit.  Since different species of trees have different amounts of these sugars and proteins, they impart different flavors to food.  The temperature at which wood burns can also impact cooking with smoke.  The ideal is low, smoldering temperatures for wood in your barbeque cooker.  Because some hardwoods burn so hot, pitmasters sometimes choose to lower the combustion temperature by soaking wood chunks in water before placing them on a fire.

Some common woods used in smoking are:
  • Alder – light, aromatic smoke; preferred for salmon
  • Apple and Cherry – sweet, fruity smoke; great with poultry and pork
  • Hickory – strong, full-flavored smoke; popular with ribs, pork shoulder, bacon, and turkey
  • Maple – sweet and fragrant smoke; goes well with chicken and full-flavored fish
  • Mesquite – heavy smoke with a pungent flavor; works best with beef and sausage
  • Oak – good all-purpose smoky flavor, not as strong as hickory or mesquite and never bitter
  • Pecan – rich, fragrant, mellow smoke; won’t overpower delicate seafood
 Mesquite is my favorite wood for barbeque and it imparts a very strong flavor to meat.  Because of that, it works best with meats that have an equally strong flavor, like beef or wild game, but I like it with everything.  I find it bit sweet and very aromatic.  It is also the most common wood used in Texas barbeque. 

My dad uses mesquite in his cooking.  When my brother and I were kids, we regularly helped him scrounge pieces from nearby ranches before our barbeques because the trees are considered a nuisance.  Ranchers aren’t too fond of mesquite trees because they compete with grass for moisture, and cattle need grass.  Right now, my dad has a plentiful supply since Hurricane Dolly knocked out several mesquite trees and he was able to chop them up and stash them my his barbeque cooker.

Sunday, May 9, 2010

Philosophy of Cornbread

People have different approaches toward making cornbread.  While some folks want their bread to taste sweet, my family would ridicule anyone who added sugar to their cornbread batter.  Others swear by bacon fat versus butter or think cornbread is perfect only with the inclusion of corn kernels.  Still others like it hot with the addition of jalapenos or another spicy ingredient.  My family made plain cornbread - no sugar, no mix-ins, baked in cast-iron in the oven.

I know Dad might disapprove, but I haven't really landed squarely in any one cornbread camp.  I've had lots of cornbread, and I have found different varieties appealing depending on the other foods with which it is paired.  I can't forswear sweetened cornbread because while I've certainly had some lousy sweet cornbread, I've also had some that was quite good.  And, while I always enjoyed the plainer cornbread I had at home, I've also tried different additives (including different fats) and have like them, too.  Upon reflection, I think I must fall somewhere in the middle.  I tend to make cornbread with butter and just a hint of sweetness (I prefer honey).  And, depending on what else I'm serving, I enjoy the texture and added flavor of shallots, corn kernels, bacon, or jalapenos in some of my batches.

This is one of my favorite cornbread recipes and I think it pairs nicely with other dishes.  I call it Cowgirl Cornbread, but it was inspired by a recipe in Food & Wine.  I'm not sure why I call it that - it just seems to fit it in my mind.  I made it this weekend to serve with the shrimp and sausage gumbo that our friends Dave and Wendy picked up for us at Cajun Kate's in Philadelphia.  Aren't we lucky to have such nice friends?

Cowgirl Cornbread
Makes one 10-inch round loaf

1 1/3 cups yellow cornmeal
2 tsp baking powder
1 tsp salt
pinch of freshly ground black pepper
1 1/4 cup milk
2 Tbsp honey
2 large eggs, beaten
1/3 cup plus 1 Tbsp canola oil
6 - 8 (one bunch) scallions, thinly sliced

Preheat the oven to 400 degrees F.  Place a 10-inch cast-iron skillet in the oven to heat.

In a medium bowl, whisk the flour, cornmeal, baking powder, salt, and pepper.  In another bowl, whisk the milk, honey, eggs, and 1/3 cup of oil.  Mix the liquid separately to ensure it all binds together.  Add the wet ingredients to the dry and whisk until just combined.  Stir in the scallions.


Take the skillet out of the oven and pour in the remaining 1 Tbsp of oil, swirling to coat.


Pour the batter into the skillet and bake in the oven for about 30 minutes or until the top is golden and a tester comes out clean.


After letting it cool slightly, you can turn it out onto a plate, or just serve hot out of the skillet, as I usually do.

Tuesday, April 27, 2010

A Secret Wrapped in a Tortilla

My family has a secret.  We don't always make our fajitas wholly from scratch.  We sometimes use a pre-marinated package of fajita meat from the Texas grocery store, HEB.  If you live in Texas and haven't tried them yet, you are missing out on something good.  Don't get me wrong, I make my own marinade for fajitas and it is delicious.  But, they work really well when you have a craving for fajitas for dinner, but it is already evening and you don't have time to marinate.  We all know that unmarinated fajitas just won't do.

You can choose from beef skirt steak, chicken thighs or breasts, and pork loin.  Pick them up with some fresh corn and flour tortillas from the HEB bakery, and you are set for a feast.  They come out of the plastic in large pieces for easy grilling and turn out tender and ready to slice and serve.  I wish for these easy fajitas pretty regularly here in DC.

During our long weekend visit, we made the beef and pork.  My dad grilled the meat over mesquite wood.  It smelled absolutely wonderful and just glistened when he brought it inside to slice.


We picked onions and bell pepper from my parents' garden to saute. 

With guacamole and grated blanco queso for additional toppings and spanish-style rice as a side, we stuffed ourselves silly.  Each mouthful was tender and rich in flavor.  These premarinated meats avoid some of the pitfalls you find with other fajitas...the marinade doesn't overpower the meat flavor and you don't have trouble tearing into each bite with your teeth.

I prefer beef fajitas with cheese and guacamole in flour tortillas and pork meat with onions and bell peppers in corn tortillas, but everyone has their individual preference.  

I'm completely dissatisfied with the tortilla selection here in the DC area, so I'm going to start practicing to make my own tortillas soon.  You will be able to read all about it here.  Advice is welcome.

Monday, April 26, 2010

Beer Review: Shiner's Kosmos Reserve

shiner-kosmos


Spoetzl Brewery in Shiner, Texas holds a special place in my heart.  Shiner Bock was the first beer I purchased legally (and probably first illegally, too).  I loved that it tasted different than most things on the market and it meant a lot to me that it was from my home state.

I found it difficult the first time I moved East, as Shiner beer was not widely available outside of Texas.  Not being able to enjoy Shiner just added to my homesickness.  The Gambrinus Company nows owns the brewery and the beer is sold in almost every state in the US.  My husband and I are able to drink Shiner Bock just about any time we want.

It is harder to find the other styles of Shiner beer, however.  While we were in Texas this weekend, I was able to enjoy a wider selection of Shiner beers, beyond the most popular Bock.  My dad picked up a Shiner Family Pack - a six pack with one bottle each of their active beers: Shiner Bock, Shiner Light, Shiner Blonde, Shiner Hefeweizen, Shiner Bohemian Black Lager, and Shiner Kosmos Reserve.

I believe Shiner Kosmos debuted in 1999, but disappeared for about a decade.  It is named after the very special brewmaster who led the brewery through Prohibition and helped the brand develop a loyal following across Texas.  It is an American Pale Lager and is available only in the mixed 6-packs and 12-packs.

It has a hoppy and flowery flavor with a thin, almost seltzer-like feel.  Its drinkability helps it pair well with food, but I enjoyed it on its own to quench my thirst after the long plane ride.  I recommend drinking it straight out of the bottle, as I did.  Prosit!

If you want to learn more about Shiner beers and the Spoetzl brewery, read the book Shine On by Mike Renfro.